Latest Posts

Beans, Beans, Beans

If you follow Kitchen Kat, you may recall the rocky beginnings that I’ve had with baked potatoes, fish and peas. Add to that list green beans. Beans suffered the same fate as the other troublesome foods. They were crisp and green in the afternoon, when my mother and I sat in the backyard, snapping off the uneven ends and tossing the trimmed veggies into colanders. By dinnertime they had become squishy and bland, the result of an hour spent bubbling away in a stockpot.

Complaints about texture and flavor led to the addition of ham to the pot. Instead of rectifying the problem ham only added to it. Now, rather than just limp, tasteless beans I also had to slip hunks of tough, grayish meat to the family dog. Mushy beans she could handle. Leathery ham? Not so much.

Eventually canned beans replaced fresh. Although canned vegetables wouldn’t normally be a treat, these particular ones were. To dress up the beans’ drab look and flavor, my mother would stir in a dollop of Cheez Whiz before serving. As unpalatable as they sound today, those salty, saucy, albeit pulpy, beans were a highpoint of family meals.

In spite of my love for this quirky dish I never whipped up cheesy green beans for myself. The shame of cooking canned beans and Cheez Whiz was simply too much. Left with bad memories of fresh ones, I stopped eating green beans altogether.

Thanks to cooking classes and a desire to give these Vitamin A- and C-filled vegetables another shot, I’ve added green beans to my dinner repertoire. Steamed or simmered until crisply tender, which should take three to five minutes, they’re a lovely addition to any menu.

Available year-round, green beans peak in the summer months. Look for slender, bright colored, crisp and blemish-free vegetables. You can store fresh, tightly wrapped beans for up to five days in the refrigerator.

HAZELNUT HARICOT VERT
Serves 4 to 6

1 pound fresh French green beans, ends trimmed
Grated zest and juice of 1 lemon
1 garlic clove, minced
1 tablespoon chopped fresh chives
3 tablespoons olive oil
1 1/2 cups cherry tomatoes, halved
1/4 cup blanched hazelnuts, toasted
Sea salt, to taste
Ground black pepper, to taste
Shaved Parmesan cheese, for garnish and to taste

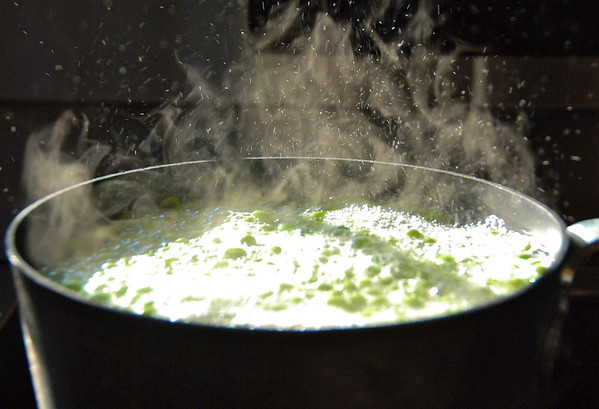
Using a steamer basket placed over a lidded stockpot, steam the haricot verts for 3 to 4 minutes or until bright green and crisply tender. Remove from heat and plunge the beans into a bowl of iced water.

In a small bowl whisk together the lemon zest and juice, garlic, chives and olive oil.

Drain and dry the beans. In a large bowl toss together the beans, dressing, tomatoes, hazelnuts, salt and pepper. Taste and adjust the seasonings before adorning with shaved Parmesan cheese and serving.

The Hidden Charm of Durian

Travel to far-flung locations and you’re bound to encounter extraordinary food. Although I tend to skip the more offbeat or infamous dishes—crickets on a stick, deep-fried chicken feet—I invariably try all the local produce. Yeah, I’m a risk taker.

Produce may not seem all that exciting until you consider the spiky, hard-shelled durian fruit. Native to Malaysia and found in tall trees, it’s known for its tough exterior, custardy interior and horrific odor. If its overpowering scent doesn’t get you, its size and sharp spikes might. Weighing up to 10 pounds, falling durian has caused serious injuries and death.

Thanks to its tough reputation, durian ranked high as a food that I had to try. Anything that smelled of rotten cheese, stinky feet and raw sewage and could kill and yet was still willingly, even eagerly, consumed must be good.

While durian will never replace bananas, raspberries or cantaloupe as my favorite fruit, it does have its charms. Its sticky, yellow pulp possesses a warm, nutty, creamy flavor unlike any other produce. Versatile, it pairs well with both sweet and savory foods. In Malaysia cooks make salty as well as sweet preserves with it while in Singapore folks use it to fill crepes and flavor ice cream.

Widely available in Southeast Asia, it’s sold on the streets and in markets from India and to the Philippines. Because of the odor, hawkers usually cut and wrap durian for their customers. As a result, eating this fruit is easy. Simply unwrap and dig in. Just don’t take it with you into the subway or other confined, public spaces. In Singapore it’s a crime to do this while elsewhere it’s merely considered rude.

If you don’t make it to Southeast Asia, you can try durian in the comfort of your own home. Asian and upscale markets carry whole, frozen fruit. Defrost before cracking open the shell and consuming.

In season from June to August ripe durians have solid, healthy stems and rattle when you shake them. They keep about two days so consume them quickly.

DURIAN ICE CREAM
From “The Food and Cooking of Singapore and Malaysia, Indonesia and the Phillipines” by Basan, Tan and Laus (Anness Publishing, 2011)
Serves 8

6 egg yolks
generous 1/2 cup superfine sugar
2 1/4 cups whole milk
12 ounces durian flesh
1 1/4 cups heavy cream

Whisk the egg yolks and sugar together until light and frothy.

In a heavy pan heat the milk to just below boiling. Whisking constantly, add the egg mixture and whisk until well blended. Strain the liquids into another pan, place the pan on medium heat and, stirring constantly, cook until the mixture thickens and forms a custard. Remove from heat and set aside to cool completely.

As the custard is cooling, puree the durian flesh in a food processor or blender.

Once the custard has cooled, whisk in the heavy cream. Fold in the durian puree and pour the mixture into the bowl of an ice cream maker. Churn until ice cream has formed. Note that if you don’t own an ice cream maker, you can pour the mixture into a freezer-proof bowl and freeze for 4 hours, beating twice with a fork or electric mixer to break up the ice crystals.

Time to Make a Cherry Pie, Sauce . . ..

Every June I’m on pins and needles, anticipating the kick off of the East Coast’s all-too-brief cherry season. As soon as those ruby globes hit the farmers’ markets, I’m stuffing canvas bags with as many sour cherries as I can carry.

What’s the allure to sour cherries? Softer and smaller than the sweet varieties, they are a highly versatile, colorful and flavorful fruit. Toss them into a saucepan with a smidgen of sugar and simmer them over low heat and I end up with the foundation for an array of amazing treats. Think I exaggerate? Think again. These guys star in, among other things, pies, tarts, preserves, sauces, meat dishes, drinks and colds soups.

Out of the 1,200 varieties of cultivated cherries, 300 are classified as sour. Within the sour family exist the aptly named Early Richmond, which is the first cherry to appear in spring, the juicy, white-fleshed Montmorency and red-fleshed Morello. Chances are that if you’ve ever drunk the liqueur Kirsch or the cocktail guignolo, then you’ve had Morellos; they form the base of both drinks.

Likewise, if you’ve ever eaten a sundae with a maraschino cherry on top, you’ve consumed a sour cherry. Hailing from Croatia, the petite marasca or maraschino cherry has become synonymous with this dessert garnish.

Whether you plan on making a pie, simmering a sauce or topping off a sundae, remember to look for semi-firm fruit with the stems intact. Store your cherries unwashed and in the refrigerator until you’re ready to use them.

MACERATED CHERRY SUNDAE
Serves 4

2 cups pitted sour cherries
3/4 cup granulated sugar
1/3 cup Calvados (apple brandy)
2 tablespoons grenadine
1 teaspoon vanilla extract
vanilla ice cream
2 tablespoons almond slivers, toasted

Simmer the cherries, sugar, Calvados, grenadine and vanilla extract over medium heat for 2 minutes, stirring occasionally, or until the sugar has dissolved. Remove the pan from from the heat and allow the cherries to cool to room temperature.

As the cherries are cooling, make a sauce for the sundaes. To do this, place ¼ cup of the macerating liquid into a saucepan and boil until reduced by half, 10 minutes. Cool before using.

When the cherries and sauce have cooled to room temperature, put one scoop of ice cream into 4 parfait glasses. Add 1 to 2 tablespoons of macerated cherries to each glass and then cover them with another scoop of ice cream. Repeat and then sprinkle the syrup and equal amounts of almonds over each sundae. Serve immediately.

Olive Olives!

For as long as I can remember, I’ve loved olives. As a little kid, I’d sneak into my parents’ kitchen, clamber up on the counter, and slide a container of black olives from the top cupboard shelf. Bounty procured, I’d consume every single salty olive in that can. Oh, the joy! Oh, the upset stomach! No matter how violently ill olive binging made me, I’d be back a few days later, pulling yet another can off the shelf.

At that time I knew very little about olives. Didn’t understand that they were fruit from the Mediterranean. Also unaware that black olives were actually ripe green olives that had, in all likelihood, been lye-cured. This curing process gave them their velvety texture and mild, oily taste. It also made them a sheer delight to eat.

Whenever I craved more complex flavors, I’d raid the refrigerator for a jar of pimento-stuffed olives. To an uncultured elementary schooler, green olives filled with red ribbons of pepper were the height of culinary sophistication. I mean, really—how could food get any more festive, fancy or flavorful than that?

Decades later I can’t resist France’s slightly tart, green Picholines and Nicoises. Nor can I pass on Greece’s purple Kalamatas and dark green Naphlions. I’m even hooked on the bold, dry-cured, black olives from Morocco. Packed in salt, dry-cured olives possess withered flesh and a stronger taste than those cured in water, brine or lye.

Picholine Sole

In the ensuing years I’ve learned that I can do a lot more with olives than eat them from a jar or can. I can use them to perk up sauces and tajines, enliven fish and poultry and make fabulous tapenades. When stuffed with ground meats, breaded and then pan-fried, they become the hearty appetizers known as olive all’ Ascolana. The Le Marche region of Italy is famous for this filling treat.

While my tastes have become more sophisticated and my options broader, I remain, at heart, an elementary school kid. My favorite way to consume olives remains straight from the container.

PICHOLINE SOLE
Serves 4

2 tablespoons unsalted butter
1 tablespoon olive oil
1/4 cup unbleached all-purpose flour
4 (4 to 6-ounce) sole fillets
Sea salt, to taste
Freshly ground black pepper, to taste
1/3 cup green Picholine olives, halved
2 tablespoons freshly squeezed lemon juice

In a large nonstick frying or sauté pan heat the butter and oil on medium. Spread the flour onto a small plate.

Season the fillets with salt and pepper. Dredge the sole through the flour, coating both sides.

Lay the fish skin-side down in the pan and cook for 3 minutes, until the skin browns and the flesh begins to turn white around the edges. Flip the fish over, add the olives, swirling them around the pan, and cook for 2 to 3 minutes, until the sole is flaky and cooked through. Place the fish on a serving platter and cover to keep warm.

Add the two tablespoons of lemon juice to the hot pan and swirl the ingredients around to blend. Pour the olive sauce over the fish and serve immediately.

Light and Crisp Calamari

On this weekend of cookouts, parades, memorial services and unseasonably sultry weather I’ve been thinking about fried squid rings or calamari. I know—90 degree temperatures do not pair well with deep-fried foods. Yet, although this dish won’t offer cool cooking for the person in the kitchen, it will make for quick, light and satisfying dining for family and friends.

plate of calamair

Light and crisp calamari

For many the first, and possibly only taste, of squid comes in the form of fried squid or calamari. In fact, in some circles the Italian name for squid, calamari, has become synonymous with oily, batter-coated cephalopods. Overloaded with gloppy batter and then overcooked, it gets written off as being greasy and tough, which it often is. Hence, why calamari may be someone’s first and last taste of squid.

This is truly a shame. When dusted with flour and cooked quickly in hot oil, fried squid can be ethereal eating. Plus, crisp and airy calamari doesn’t take long to prepare. If you’ve got 5 minutes, you can make a heaping plate of tasty fried squid.

squid bodies

Cleaned squid

For my calamari I use purse seine- or jig-caught, California-sourced squid tubes. Low in contaminants and with a healthy, quickly reproducing population, this is presently the eco-friendliest squid. Eco-friendly statuses change periodically so, for up-to-date ratings, consult the Monterey Bay Aquarium’s Seafood Watch.

To begin, I slice the squid bodies into 1/4-inch rings. Smaller rings mean quicker cooking. The less time the squid lingers in the bubbling oil, the less greasy and chewy my resulting dish will be.

squid rings in hot oil

Squid bubbling away

Rather than dip my squid into a thick batter, I toss the rings in a mixture of flour, salt and pepper. I then quickly fry the squid in batches in very hot oil. In two to three minutes I’ve got a heaping plate of steaming calamari, all ready to consume.

SIMPLE CALAMARI

Serves 2

1 pound squid rings
3/4 cups unbleached all-purpose flour
1 teaspoon sea salt
1 teaspoon ground black pepper.
Grapeseed oil, enough to fill a stockpot or deep fryer with 4 inches of oil.

Heat the oil on medium-high. When the temperature reaches 350˚F, you’re ready to start cooking.

Pat dry the squid rings so that they don’t splatter when they hit the hot oil.

Place the flour, salt, and pepper in a bowl. Add the squid rings and toss to coat.

If you own a fryer basket, put the coated squid in it. Otherwise, gently lower the squid in the hot oil. Allow
the squid to fry until golden, 2 to 3 minutes.

Using a slotted spoon or strainer, remove the fried calamari and place on paper towels to dry. Serve hot with tomato sauce or aioli for dipping.

Crazy about Quinoa

Right now I’m on a quinoa kick. For those unfamiliar with my new love, this small, hearty grain hails from the Andean region of South America. Cultivated there for at least 3,000 years, quinoa was a favorite of the Incas, who considered it a sacred food and referred to it as “the mother grain.”

Nurturing it is. Packed with essential amino acids, its protein quality and amount rival that of milk. It’s also high in calcium and fiber and lower in carbohydrates than other grains. Eat a serving of quinoa and you won’t feel the pang of hunger for hours. No doubt that’s why many call it “the super grain of the future.”

Nutrition aside, I’m smitten with quinoa’s mildly nutty, herbal flavors. These pair well with both sweet and savory ingredients. Depending upon my mood and what I have on hand, I can just as easily add dried cranberries, apricots or dates, fresh apples and candied nuts as garlic or onions, peppers, and cheese to it.

Although I serve quinoa as a salad or a substitute for rice and couscous, it does have a host of other uses. In Peru and Bolivia, where the bulk of quinoa is grown and consumed, cooks may boil it as I do or add it to soups or stews. They grind it into flour for breads, tortillas, cookies and other baked goods. They also eat it as a cereal and turn it into pudding. Quinoa greens are cooked as vegetables while its stalks are burned as fuel. Seemingly no part of the plant isn’t used.

Before being processed, quinoa, which is actually a seed from the flowering quinoa plant, varies in color from black to yellow or white. Once processed, it becomes a lovely shade of ivory; the exception to this is red quinoa, which, as the name suggests, remains red.

Each tiny seed possesses a slender, white band that unravels during cooking. This band gives quinoa its unique texture and appearance.

QUINOA SALAD
Serves 6

1 cup uncooked quinoa
2 cups water
1/2 teaspoon sea salt
1 1/2 teaspoons dried parsley
2 tablespoons sherry vinegar
3 tablespoons extra-virgin olive oil
1 tablespoon butter
1 garlic clove, minced
1 cup frozen or fresh corn
2 tomatoes, seeded and chopped
1/4 cup pecans, finely chopped

Rinse and drain the quinoa. Place it and the water in a medium saucepan and bring to a boil. Reduce the heat to a simmer, cover and cook until all the water is absorbed, 10 to 15 minutes. Take the pan off the heat and toss the quinoa to separate the grains. Allow the quinoa to cool to room temperature.

In a small bowl whisk together the salt, parsley, vinegar and olive oil. Set aside.

Melt the butter in a small frying pan on medium heat. Add the garlic and corn and saute for 2 to 3 minutes, until hot and just cooked through.

Place the corn, quinoa, tomatoes and pecans in a large mixing bowl and toss to combine. Drizzle the dressing over the salad and toss again to coat. Refrigerate for 30 minutes or until ready to serve.

Want Fries in That?

A month ago if you had asked how my hometown sets itself apart from other regions and their cuisines, I would have struggled to come up with an answer. To me, the Pittsburgh area has long been a melting pot of ethnic specialties. Pizza, pierogies, pita and souvlaki all played a part in shaping my palate.

Then I took a trip back home and was reminded how much Pittsburghers like their fries. I admit, most people like a good, crisp, golden french fry. How many, though, slip them inside breakfast, lunch and dinner entrees? Where I grew up, a lot do.

As my college roommate reminded me over a shrimp salad served atop fries, we were raised on salads with deep-fried potatoes tucked in between the lettuce leaves. Then there were the odd omelets filled with cheese, meat and french fries. And how could I forget Primanti Bros.’s fry- and coleslaw-stuffed sandwiches, which I still insist on having any time that I’m in Pittsburgh.

Why fries on the inside? Well, there are fewer plates to wash if you don’t serve them as a side. Pick them up between two slices of bread and you forgo the greasy fingers. Yet, I doubt that these are the reasons why. I’ll chalk it up to a happy accident—someone tried it, liked it, served it to someone else and the rest is history.

In my health-conscious family we didn’t eat fries, in or alongside entrees, very often. Delightfully salty and oily, they were a rare treat, one that my mother left to those possessing fryolators and serious grease burns.

Unfortunately, I haven’t strayed far from her stance. Want savory, fried potatoes at my house? Unless you bring your own french fries, you’ll probably eat the following side dish. Slipping them into your salad, sandwich or omelet is optional.

CRISPY ROSEMARY POTATOES
Serves 6

2 1/2 pounds russet potatoes, peeled, quartered, and cut into 1/2-inch thick slices
1/3 cup plus 1 tablespoon olive oil
1 garlic clove, minced
1 1/2 tablespoons minced fresh rosemary
Sea salt, to taste
Freshly ground black pepper, to taste

Place the potatoes in medium-sized stockpot filled with boiling salted water. Boil until the potatoes are slightly tender, 4 to 6 minutes. Drain the potatoes and set aside.

In a large frying or sauté pan heat the olive oil on medium-high.

Add the potatoes and cook, tossing periodically, until browned, 15 minutes.

Add the garlic, rosemary, salt, and pepper, stir to combine, and cook for 5 minutes. Taste and adjust the seasonings if necessary. Serve immediately.

Peas: A Hate-Love Story

peas cooking

I’ve spent a lifetime struggling to like peas. My aversion to this vegetable started early, when my mother opened that first store-bought can of them. Withered and grayish-green, they resembled one of the oldest vegetables in existence, which, in fact, they are. Robbed of their natural sweet succulence as well as any helpful seasonings, they likewise tasted as though they’d hung out in their can for centuries.

Had my subsequent experiences been tastier I may not have loathed peas so. Yet, each time I forced down spoonfuls of these bland, boiled terrors, I came to the same conclusion—nothing, not even the addition of cheery yet eerily symmetrical carrots, could make me like these shriveled veggies.

Things became complicated when I married a man who loved my nemeses. On paper I could see why he liked them. Chocked full of vitamins A and C, niacin, iron, fiber and protein, they’re highly healthful. They also have a huge following, one which claims that, when plucked fresh from the garden, peas are sweet, crisp and utterly delightful. Unfortunately, in my experience they had come not from my father’s short-lived garden or a local farm stand but from the canned goods aisle of the neighborhood grocery store. It would take more than nutrition and good press to change my opinion about peas.

Peas in a pod

Peas still in their pod

What it took was a trip to England. Say what you will about British cuisine but the cooks there know how to prepare peas, especially mushy peas. Found in pubs as well as restaurants, these roughly mashed, emerald orbs were the antithesis of my childhood veg. Laced with butter, salt, pepper and a smidgen of creme fraiche, they were luscious, flavorful and, for the first time in my life, enjoyable—so enjoyable that I started requesting them in restaurants and making my own at home.

As one might expect, the key to good peas, mushy or otherwise, is good peas. If fresh aren’t available, go for frozen. Having learned from experience, I avoid canned at all costs.

Fresh peas are at their peak from March through May. If you buy them in their pods, look for plump, unbruised and bright green ones. Leave them in their shells until just before cooking. Be sure to use fresh peas as soon as possible; their sugars quickly convert to starch, giving them the drab, unpleasant flavor that I long associated with them.

ELLIOT’S GARLIC PEA PUREE
Because I’ve made these garlicky mushy peas countless times for my friend Elliot, they have become more or less his dish.

Serves 4 to 6

10 to 12 garlic cloves, peeled
5 cups frozen or fresh peas
2 tablespoons unsalted butter, softened
3 to 4 tablespoons creme fraiche
1/2 teaspoon ground black pepper
Sea salt, to taste

Bring a medium saucepan filled with water and garlic to a boil. Cook until the cloves have softened, about 5 minutes. Add the peas and cook for 10 minutes or until quite tender.

Drain and place the vegetables in a food processor or blender. Add the butter, creme fraiche, pepper and salt and pulse until combined but still chunky. Serve warm.

Eggcelent Cocktails

three types of cocktails

Whether you dye them an array of pretty pastels or whip them up for brunch, chances are that over the next few days you’ll be working with eggs. Since we’re in the midst of another holiday season, a period that can cause even the staunchest teetotaler to crave a stiff drink, I’m fully in favor of putting some of those eggs to a totally adult use and shaking up a few egg-infused, classic cocktails.

Because I tend to shy away from thick, heavy beverages, I’m somewhat of a newcomer to the egg yolk-based concoctions known as flips. Originating in the 17th century, early flips featured beer, rum, egg yolks and sugar. Today’s flips omit the beer and include such flavorings as chocolate, coffee, nutmeg or cinnamon. Rich, velvety and filling, they’re quite nice on a cold, blustery night or when you hanker for something more substantial in your glass.

What I do know and love are frothy, egg white-laced cocktails. Requiring only a tablespoon or two of egg whites and a generous amount of shaking, these foamy creations include the ever-popular Pisco Sour, Apple Sour, Round Robin and a series of “lady drinks” such as White Lady, Perfect Lady and My Fair Lady. Dating back to the 1950’s, the last drink was invented at London’s Savoy Hotel and serves as a tribute to the Lerner and Loewe musical “My Fair Lady.”

Because these cocktails are so strong and boozy, I don’t worry too much about the inclusion of raw eggs. Truthfully, I cling to the hope that the alcohol kills off any bacteria. So far, so good. You could, however, omit the eggs. The result won’t be as luscious or foamy but it’ll still be tasty.

If you decide to make one of these powerful potions, just remember to use the freshest eggs possible. And shake, shake, shake until you get a good, thick froth and smooth consistency.

Coffee flip

COFFEE FLIP
Makes 1

1 large egg, separated
2 teaspoons confectioner’s sugar
1 1/2 tablespoons cognac
1 1/2 tablespoons Kahlua or other coffee liqueur
2 tablespoons strongly brewed coffee, at room temperature
3 tablespoons heavy cream
ice cubes, for mixing
sweetened cocoa powder, for dusting

Place the egg yolk, sugar, cognac, Kahlua, coffee and cream in a cocktail shaker and mix the ingredients together. Add the egg white and ice cubes and shake repeatedly and hard until the drink is frothy. Pour into a tall glass and dust the top with cocoa powder. Enjoy!

APPLE SOUR
Makes 1

1 teaspoon confectioner’s sugar
1 tablespoon fresh lemon juice
1 1/2 tablespoons calvados
1 1/2 tablespoons cognac
1 egg white
ice cubes, for mixing

Place the ingredients in a cocktail shaker and shake until frothy and well-combined. Drain into a cocktail glass and serve immediately.

MY FAIR LADY
From Stuart Walton’s The Ultimate Book of Cocktails (Hermes House, 2003)
Makes 1

1 1/2 tablespoons gin
2 teaspoons orange juice
2 teaspoons lemon juice
1 teaspoon cream de fraise
1 egg white
ice cubes, for mixing

Place the ingredients in cocktail shaker and shake thoroughly. Strain into a cocktail glass and serve.

The Year of the Beet?

Although beets didn’t make the list of 2012 food trends, I’m beginning to think that they should have. Everywhere that I go, I see these gorgeous root vegetables. Even restaurants pledging to serve seasonal, local foods are doling out salads, soups and sides of purple, golden, white and candy cane-striped beets. I’m not complaining. If there’s one vegetable that I can happily eat day in and day out, it’s a sweet beet.

Beauty as well as taste must be influencing this current craze for you just can’t beat the aesthetics of this veggie. Tumble a handful of luscious magenta beets over a mound of otherwise bland greens and you go from dull to dazzling in seconds. Toss a few yellow slices atop pasta or grilled chicken and you end up with a sunny meal to brighten the chilliest and rainiest spring days.

Sold year-round, beets are at their peak from June to October. During this time I can buy the usual purple as well as the more colorful varieties. I can also pick up crisp beet greens to use in salads and sautes. When they’re not in season, I turn to canned whole beets. While not as flavorful as fresh, they do a decent job in soups and sides.

Because I love the slightly sweet tang of beets, I keep their preparations simple—just roast and dress them with a dash of lemon juice or vinegar and allow their unique flavor to shine through. When I’m in need of a fancier dish, though, I make the following chilled beet and apple salad.

CHILLED BEET AND APPLE SALAD
Serves 4

3 cups (about 1 3/4 pounds) cooked beets, chilled and diced
1/4 cup diced yellow onion
1 1/2 green apples, peeled and diced
2 tablespoons minced fresh tarragon
3 tablespoons cider vinegar
3 tablespoons extra-virgin olive oil
1/4 teaspoon freshly ground white pepper
2 tablespoons freshly squeezed lemon juice
1 teaspoon granulated sugar

In a medium serving bowl mix together the beets, onion, and apple. In a separate bowl whisk together the tarragon, cider vinegar, olive oil, salt, and pepper and pour it over the salad. Cover and refrigerate until chilled.

Before serving, mix together the lemon juice and sugar. Drizzle over the salad and serve.