Latest Posts

sweet potato pudding

Sweet Potato Pudding

sweet potato pudding

Every time I bake a soft, honeyed sweet potato, I think, “Boy, I don’t eat enough of these!” As the name indicates, this root vegetable possesses a pleasing sweet flavor, one that goes well with a variety of foods and preparations. It also has a deep orange hue that enlivens any dinner or dessert plate. Its gorgeous color comes from the large amount of beta carotene that it contains. An antioxidant, beta carotene converts into Vitamin A. Pretty, delicious and nutritious!

Selecting the right root

In the U.S. we use the terms “sweet potato” and “yam” interchangeably. They are not the same vegetable. They aren’t even from the same plant family. Although they both come from Southern America and are root vegetables, yams have a woodier, more root-like appearance. Their skins range from off-white to dark brown. Their slightly mealy flesh runs from off-white to pink. Unlike sweet potatoes, they must be cooked before eaten. If you’re not shopping at a specialty/international market and you spot a mound of potatoes labeled “yams,” chances are you’re buying sweet potatoes.

Cooked and sliced sweet potatoes

Southern Specialty Reinvented

Okay, I didn’t really reinvent a thing. I was just too pressed for time to make a homemade crust for a sweet potato pie. Instead, I altered a few ingredients, poured the filling into buttered and floured ramekins and baked the puddings until set.

Like the Southern specialty from which it originated, Sweet Potato Pudding has a rich, warm flavor and sumptuous texture. Unlike that dessert, it also has a bit of a crunch. A dusting of cinnamon sugar gives each pudding that extra bite.

Sweet Potato Pudding

Serves 6 to 8

1 1/2 pounds sweet potatoes, washed

2 tablespoons unsalted butter, melted

¾ cup firmly packed light brown sugar

2 large eggs, whisked

1 teaspoon vanilla

1 cup milk

1 teaspoon cinnamon

½ teaspoon salt

¼ teaspoon nutmeg

Cinnamon sugar, for dusting

Whipped cream, optional, for serving

Bring a large saucepan or small stockpot filled with salted water to a boil. Add the sweet potatoes. Cook until very tender, 20 to 25 minutes.

Drain the potatoes and allow them to cool slightly.

Preheat the oven to 400˚ Fahrenheit. Butter and flour the 6 to 8 ramekins. Place them on a baking sheet and set aside.

Sweet potato pudding ready to be poured into ramekins

Once the sweet potatoes have cooled, peel off and discard their skins. Cut the potatoes into chunks and place them in the bowl of a blender or food processor. Puree until smooth and creamy, 1 minute. Whisk together the butter, light brown sugar, eggs, vanilla, milk, cinnamon, salt and nutmeg. Add to the potatoes and pulse to combine.  

Pour equal amounts of the sweet potato pudding into the ramekins. Bake until the puddings’s edges are firm but their centers wiggle slightly when the baking sheet is jiggled, 25 to 30 minutes.

Remove the baking sheet from the oven and place the ramekins on a wire cooling rack. Dust the tops with cinnamon sugar. Serve warm with optional whipped cream.

cold herby cucumber soup

Cold Herby Cucumber Soup

cold herby cucumber soup

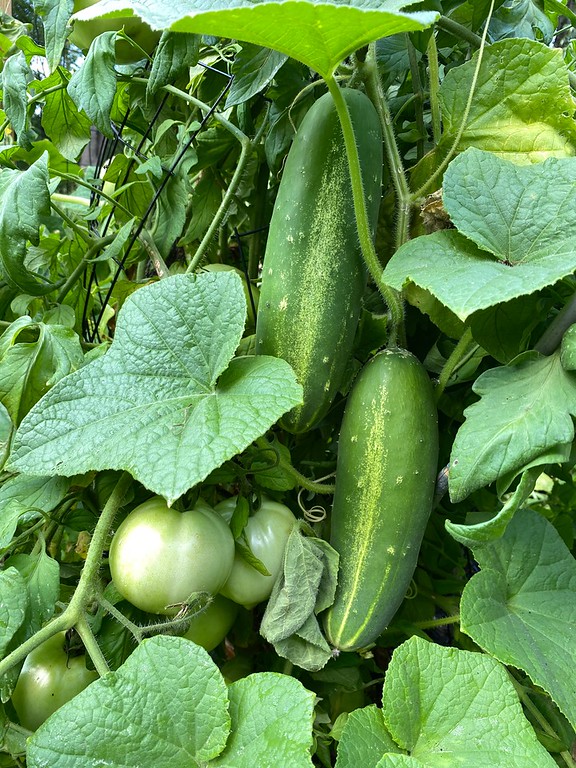
Cold herby cucumber soup is my global pandemic dish. Had it not been for the coronavirus and resulting quarantine, I wouldn’t have stayed in Southeastern Pennsylvania long enough to plant and tend a garden, one that produces an absurd amount of cucumbers and herbs. I also wouldn’t have considered teaching virtual cooking classes.

Unlike in-person classes, where we work with a host of ingredients and equipment, online courses require simpler recipes. After all, I can’t expect people to spend hours tracking down unusual spices and produce or invest in special kitchen tools. That’s where a quick, easy dish like Cold Herby Cucumber soup comes in handy.

cucumbers and tomatoes on the vine
Cucumbers and tomatoes grow together and go together

A few words about cucumbers

Originating in India over 3,000 years ago, cucumbers are one of the oldest cultivated plants. Although classified as a fruit, they are used as a vegetable in salads, soups and hors d’oeuvres. While North Americans consume them raw, parts of Asia and Europe also cook them.

Cucumbers consist of 95% water, making them a great thirst quencher. Low in calories and fat-free, they possess a small amount of Vitamin K. Mild in flavor, they go well with many ingredients, including basil, chili peppers, cilantro, dill, garlic, lemon, mint, onions, parsley, salmon, sour cream, tomatoes, vinegar and yogurt.

fresh cucumbers and basil from the garden
I grew this!

Equipment for cooking

To make this soup, you’ll need two pieces of special equipment, a food processor or blender and a fine mesh strainer or colander. In all likelihood, you already own these two tools.

All of the ingredients in Cold Herby Cucumber Soup go into the bowl of your food processor or blender. There they get pulsed until well combined. Yea! It’s a “one-pot” meal!

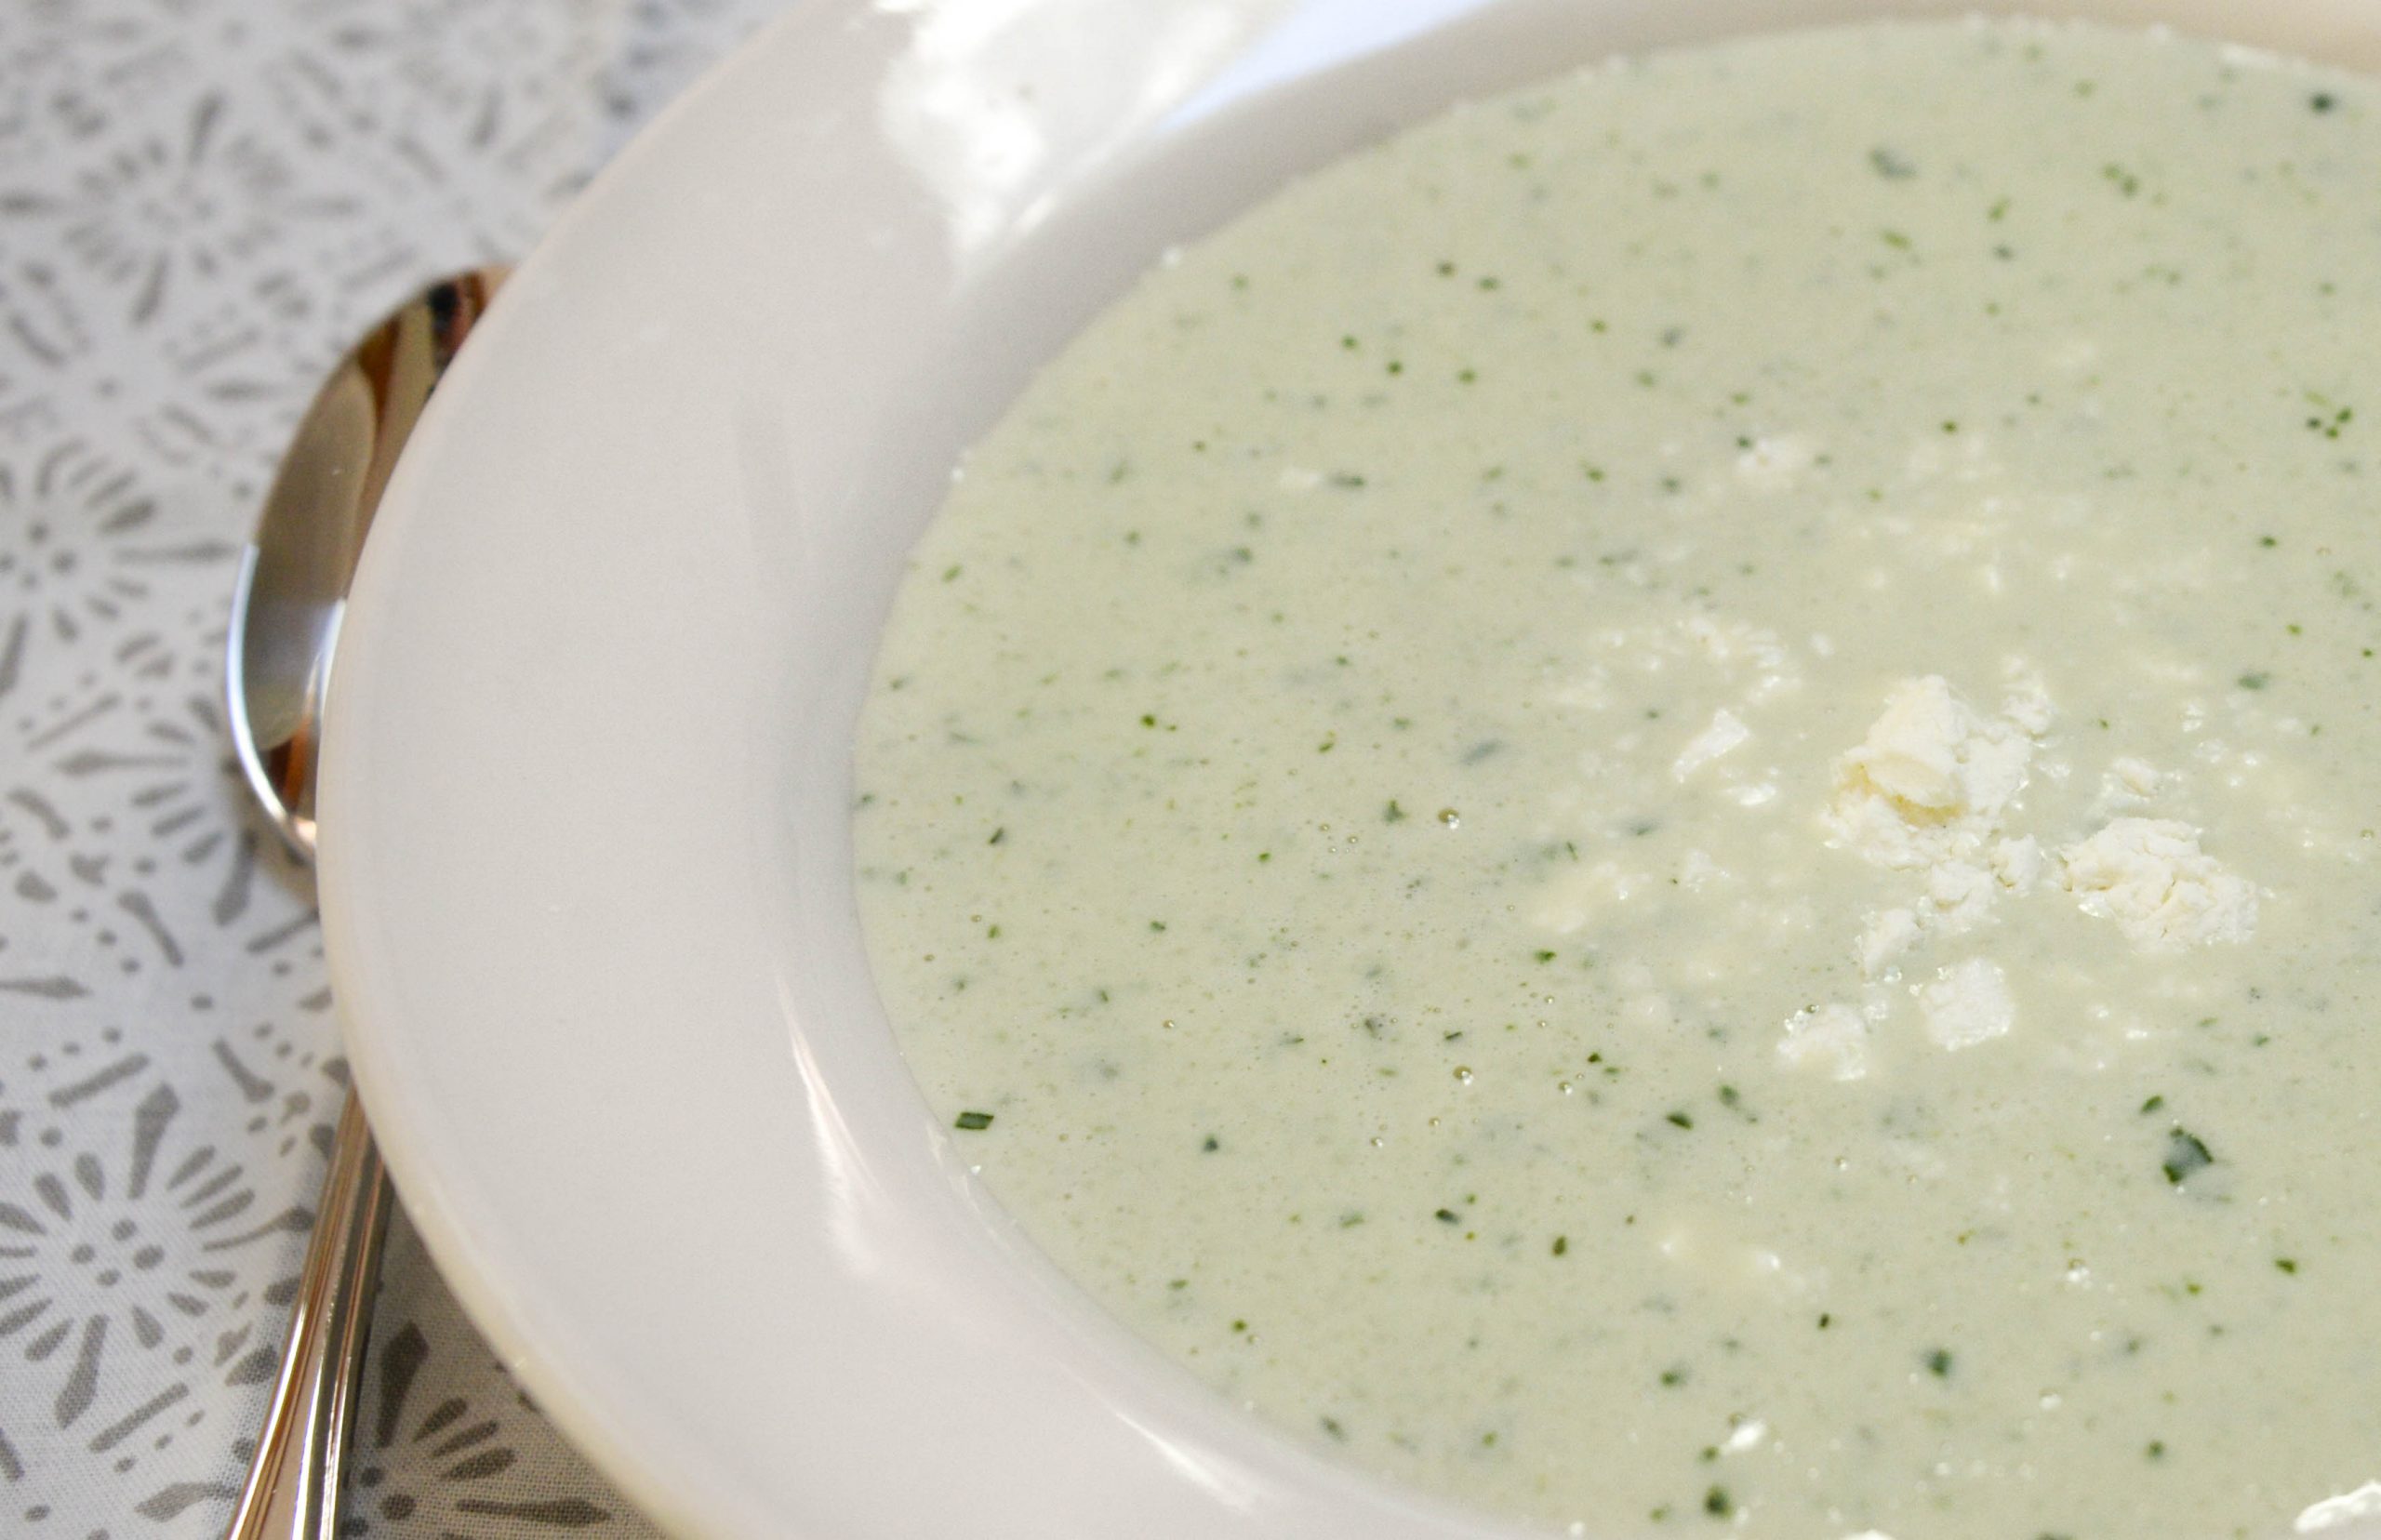
Because we don’t want an extremely chunky soup, you will use a fine mesh strainer or colander to strain half of the ingredients into a large bowl. The other half can be added, as-is, to the bowl. By stirring the chunky and smooth soups together, you create a complex and delicious, lightly textured dish.

Making Cold Herby Cucumber Soup

In case anyone would like to watch a YouTube video on making Cold Herby Cucumber soup, here’s an excerpt from my Zoom class on Cool Foods.

Cold Herby Cucumber Soup

If making this soup in advance, place it in the refrigerator to chill. Depending on how long it’s refrigerated, you may not need to include the ice cubes.

Serves 2 to 4

Ingredients

1 1/4 pounds cucumbers, washed

1 clove garlic, smashed

2 scallions, washed, roots removed and ends trimmed slightly

½ cup firmly packed mixture of fresh basil, mint and parsley, washed and drained

1 1/3 cup plain Greek yogurt

1 teaspoon salt

½ teaspoon sherry or white wine vinegar

3/4 teaspoon soy sauce

¼ cup water, divided

Ice cubes, for chilling

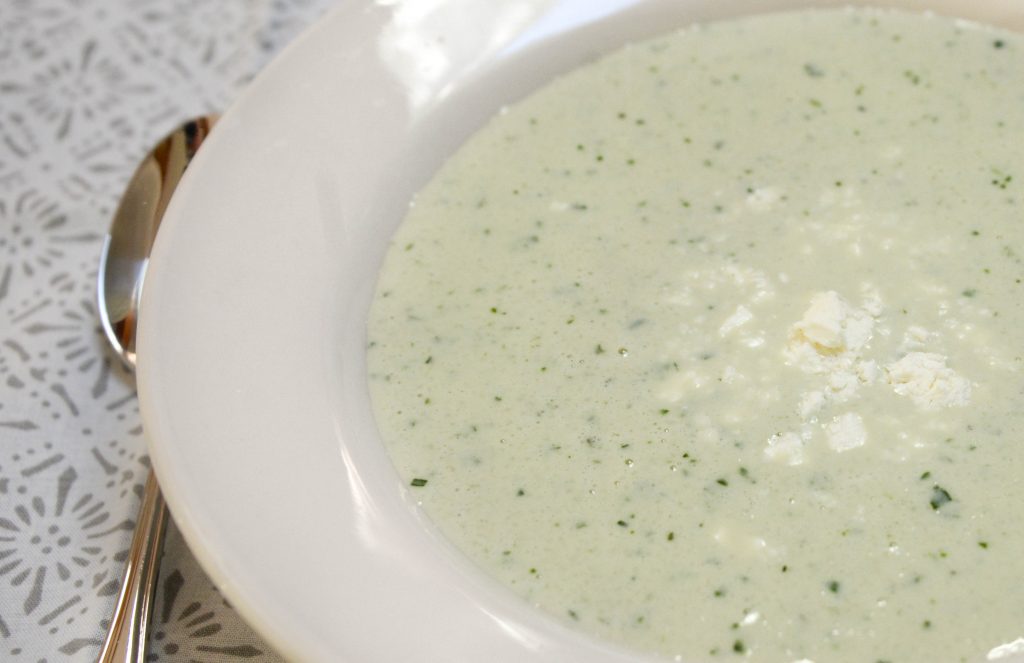
Feta cheese, crumbled, for serving

Using a vegetable peeler or knife, remove the skins from the cucumbers and discard.

With a sharp knife slice the cucumbers into quarters length-wise. Still using the knife, remove the seeds from the cucumbers and discard them.

Place the cucumbers, garlic, scallions and herbs in the bowl of a food processor or blender. Pulse the ingredients until chopped.   

After scraping down the sides of the bowl, add the yogurt, salt, vinegar, soy sauce and half of the water to the bowl. Process the ingredients until smooth. If the soup appears too thick, add the remaining water.

Pour half of the soup through a fine mesh strainer into a large mixing bowl. Using a spoon, press down on the solids in the strainer so that all of the liquid goes into the bowl. Discard the solids.

Pour the remaining soup directly into the bowl. Add several ice cubes and stir to combine and chill. When the soup has reached the desired cold temperature, remove the ice cubes and spoon the soup into bowls. Top with crumbled feta cheese and serve.

mushroom vegetarian cheesesteak

All Mushroom, No Steak Mushroom Cheesesteak

mushroom vegetarian cheesesteak

Saint Augustine advised, “When in Rome, do as the Romans do.” So, when quarantining outside of Philadelphia, the cheesesteak capital of the U.S., I started making cheesesteak sandwiches but with a little twist. Instead of thinly sliced beef, I used the “meat of the vegetable world,” mushrooms. The result was a lighter, less fatty but no less delicious mushroom cheesesteak.

History of an iconic sandwich

Legend claims that, in 1930, tired of dining on hot dogs, brothers and South Philadelphia hot dog stand owners Pat and Harry Olivieri asked a local butcher for beef scraps. The two fried this beef alongside some onions from their condiment tray and stuffed the mixture into rolls. When a passing cab driver asked to buy their hot, juicy dinners, a culinary classic was born. By the 1960s, cheese topped the beef, giving the sandwich its name, “cheesesteak.”

Roughly 90 years after its inception, a debate rages over what makes a great cheesesteak. Some swear by cheese, while others demand Cheez Whiz, the topping used at Pat’s King of Steaks, home of the first cheesesteak. Others debate the merits of soft vs. crusty Italian rolls. Then there is the issue of whether to douse the meat with tomato sauce or leave it unadorned. Whether to make it without meat, as in my no steak mushroom cheesesteak, would undoubtedly be an affront to the cheesesteak afficionados.

Steak-free mushroom cheesesteak

I first tried at meatless mushroom cheesesteak at Mets versus Phillies game. While I can’t remember who won, I can recall that gateway sandwich. Hot, savory and oozing out of its wrapper onto my hands and t-shirt, the seitan-based sandwich was outrageously good. If this was what ballpark food was like, sign me up for season tickets! I want to eat here all summer!

As much as I enjoyed my first steak-free mushroom cheesesteak, I wished that it had included one thing, more mushrooms. Truthfully, I would have loved it to be all mushrooms. The love of mushrooms, memory of that delectable sandwich, and the fact that I had stocked up on mushrooms and rolls before sheltering-in-place, inspired me to make the following no steak mushroom cheesesteak.

All mushroom, no steak mushroom cheesesteak

No Steak Mushroom Cheesesteak

Makes 2 6-inch mushroom cheesesteak sandwiches

2 tablespoons olive oil

20-ounce mixture of cremini and white button mushrooms, cleaned and sliced

1/2 teaspoon salt

1/4 teaspoon ground black pepper

1 teaspoon dried parsley

1/2 cup halved and thinly sliced white onion

2 cloves garlic, minced

4 pieces Provolone cheese

2 6-inch hoagie rolls

Ketchup, optional, for serving

In a large sauté or frying pan heat the olive oil on medium high until it starts to shimmer. Add the mushrooms and salt. Stirring frequently, cook until the mushrooms have released their liquid and begun to soften, 5 to 7 minutes.

Sautéing the mushrooms

Add the black pepper, parsley, onion and garlic to the mushrooms and stir to combine. Reduce the heat to medium. Continue cooking until the liquid has evaporated and the onions and garlic are soft but not browning, 3 to 5 minutes.

Line each hoagie roll with 2 slices of Provolone cheese. Spoon equal amounts of mushrooms into each roll. Top each mushroom cheesesteak with optional ketchup and serve with plenty of napkins.

slice of coffee cake

Brown Sugar-Almond Coffee Cake

slice of coffee cake

I’ve been doing a lot of armchair traveling, looking at old photos and travel journals and cooking and baking dishes that I first tried in far-flung locations. After revisiting several trips to Sweden, I started to crave coffee cake. This, in turn, prompted me to bake my brown sugar-almond coffee cake.

In Sweden the coffee break or fika means just that—you take a break to have a cup of coffee and a baked good. It could be a slice of tart, a cinnamon roll or chocolate ball. Or, it could be a piece of cake served with coffee. Hence the inspiration for “coffee cake.”

Slicing into the Brown Sugar-Almond Coffee Cake

Often Swedish coffee cakes include almonds and such spices as cardamom, cinnamon and ginger. Among the traditional coffee cake offerings are almond tortes and apple, spice or pound cakes. American coffee cakes differ in that they frequently feature sour cream in their batters and streusel and a glaze on top. They tend to be sweeter than their Swedish counterparts. The sweet, aromatic and nutty Brown Sugar-Almond Coffee Cake is a nod to both the Swedish and American versions.

Brown Sugar-Almond Coffee Cake

If you have a 9-inch tube/angel food cake pan, use it for this recipe. If, like me, you can’t find your tube pan, use a Bundt pan instead. There will be a slight difference in how you put the batter in the pan but this difference is detailed in the recipe.

Serves 10 to 12

for the streusel:

1 cup all-purpose flour

1 cup minced blanched almonds

1 cup firmly packed light brown sugar

1 1/2 teaspoons ground cinnamon

1 teaspoon salt

8 tablespoons (1 stick) unsalted butter, melted

for the cake:

2 cups all-purpose flour

1 1/4 teaspoons baking powder

1/2 teaspoon baking soda

1/2 teaspoon salt

8 tablespoons (1 stick) unsalted butter, at room temperature

1 cup granulated sugar

2 large eggs, at room temperature

1 teaspoon vanilla extract

1 teaspoon almond extract

1 cup sour cream

for the glaze:

1 cup confectioner’s sugar, sifted

2 tablespoons milk

To make the streusel:

Place the flour, almonds, brown sugar, cinnamon and salt in a large bowl and stir to combine. Pour in the melted butter and stir the ingredients together until you have a crumbly mixture. Set the bowl aside.

bowl of streusel
If you crave a crumblier streusel, use your fingers to mix the ingredients.

To make the cake:

Preheat the oven to 350 degrees Fahrenheit. Grease a 9-inch tube or Bundt pan. Sift the flour, baking powder, baking soda and salt into a large bowl and then set aside.

Using an electric hand or stand mixer, beat the butter for 30 seconds, scrape down the bowl and add the sugar. Beat the ingredients together for 2 to 3 minutes, until light and fluffy. Add the eggs, vanilla extract and almond extract and beat again until blended.

After scraping down the sides of the bowl, add 1/3 of the flour and beat to combine. Scrape down the bowl, add half of the sour cream and beat to combine. Repeat these steps until all of the flour and sour cream has been incorporated.

If you’re using a Bundt pan, evenly spread 1/3 to 1/2 of the streusel on the bottom of the Bundt pan. Spoon half of the batter over the streusel. Place the remaining streusel over it and then spread the remaining batter on top of the streusel.

If you’re using a tube pan, you will spoon half of the batter into the tube pan. Top that with 1/2 to 2/3 of the streusel. Evenly distribute the remaining batter and then top it with the last portion of streusel.

Bake for 50 to 55 minutes, until golden in color and a cake tester inserted into the cake comes out clean. Remove the pan from the oven, place it on a wire rack and allow it to cool completely before removing it from the pan. You will want the exposed streusel to be the top of the cake.

unglazed coffee cake
Brown sugar-almond coffee cake without glaze

To make the glaze:

Whisk together the confectioner’s sugar and milk. Drizzle the glaze over the streusel. Serve at breakfast with coffee or as a dessert.

chocolate mud cake

Chocolate Mud Cake

chocolate mud cake

Like Mississippi mud pie, chocolate mud cake reputedly gets its name from its moist, dark texture, which is said to resemble the muddy banks of the Mississippi River. Because I first tried chocolate mud cake roughly 10,000 miles from the Southern United States, on the South Coast of Australia, and because this cake is so heavenly, I’m not convinced of this story. How could something this delicious have its roots in something as unappetizing as wet dirt or sludge? Perhaps “mud” hints at the inclusion of strong, black coffee. Sometimes referred to as mud, dirt, java or joe, coffee adds a tangy complexity to this chocolatey cake.

slice of chocolate mud cake
As seen from this slice, this is a dense, rich cake.

Along with its decadent flavor and melt-in-your-mouth texture, chocolate mud cake has simplicity in its favor. To make the batter, you stir together butter, chocolate, sugar, instant espresso or instant coffee powder and boiling water. Add those ingredients to eggs, vanilla, flour and cocoa and stir until combined. With that you create a luscious cake batter that you pour into a baking pan. It’s that easy!

Topping off the cake

Traditionally, chocolate mud cake is topped with a mixture of melted chocolate and cream or ganache. If you crave something a little lighter, you could dust the cake with confectioner’s sugar, dress it with fresh berries or serve it unfrosted with a scoop of ice cream.

Chocolate mud cake!

Chocolate Mud Cake

For this recipe I would encourage the use of a kitchen scale to precisely measure your ingredients.

Serves 8 to 10

for the cake:

6 1/2 ounces (3/4 cup plus 1 1/2 tablespoons) unsalted butter

12 ounces (1 2/3 cups) granulated sugar

5 1/4 ounces (3/4 cup plus roughly 1 tablespoon) bittersweet chocolate

12 1/2 ounces (generous 1 1/2 cups) hot water

1 tablespoon instant espresso powder

1 large egg

1 1/2 tablespoons egg substitute (Egg Beaters or other brands)

1 teaspoon vanilla extract

5 3/4 ounces (roughly 1 1/3 cups) all-purpose flour

1 ounce (roughly 2/3 cup) unsweetened cocoa

for the ganache:

3 ounces (1/4 cup plus 2 tablespoons) milk

6 ounces (1 cup) semi-sweet chocolate morsels

Preheat the oven to 325 degrees Fahrenheit. Grease and line an 8-inch round cake pan with parchment paper.

Place the butter, sugar, chocolate, water and instant espresso in heavy bottomed saucepan. Simmer over medium-low, stirring frequently, until the mixture is smooth. Remove the pan from the heat and set aside to cool.

In a small bowl whisk together the egg, egg substitute and vanilla extract.

In a larger bowl whisk together the flour and cocoa.

Whisking together the flour and cocoa

Once the chocolate mixture is lukewarm, whisk in the egg and vanilla. Add the flour mixture and whisk the ingredients together until smooth.

Pour the batter into the cake pan. Bake for 50 to 60 minutes, until the center is firm and a toothpick inserted into the center comes out clean. Remove the pan from the oven and place it on a wire rack. Allow the cake to cool for 10 minutes before removing it from the pan. Let it cool completely before icing.

To make the ganache, place the milk in a saucepan and bring to a boil over medium-high heat. Add the chocolate morsels, remove the pan from the heat and stir together until the chocolate has melted and the ganache is smooth. Using a spatula, spread it evenly over the cake. Serve with or without whipped cream or a scoop of vanilla ice cream.

slice of apple-applesauce cake

Apple-Applesauce Cake

slice of apple-applesauce cake

Apple-Applesauce Cake is one of those quintessential quarantine recipes. I had an extra Granny Smith apple, a jar of applesauce, carton of expiring eggs, butter and flour in my kitchen. Add to those ingredients too much free time in my schedule. So, I baked a moist and aromatic apple-applesauce cake. Since all of this spare time allows me to write and test recipes at a much greater pace, I’ll share this easy, tasty cake.

Originally, I made the cake with only one apple. If you have two on hand, I would slip in the additional fruit. This result is an even more luscious dessert. As for the applesauce, I’d suggest unsweetened. Whether it’s smooth or chunky is your call. If you want a less sweet treat, something you could eat, guilt-free, at breakfast, omit the glaze on the cake.

apple-applesauce cake
Cooled and glazed Apple-Applesauce Cake

Apple-Applesauce Cake

Serves 8 to 10

for the cake:

1 stick (8 tablespoons) unsalted butter, at room temperature

1 cup firmly packed light brown sugar

1 large egg, at room temperature

2 tablespoons plus 1 teaspoon honey

1 1/2 cups all-purpose flour

1 teaspoon baking soda

1/2 teaspoon salt

1 teaspoon ground cinnamon

1/2 teaspoon ground cardamom

1/8 teaspoon ground nutmeg

1 cup applesauce (original or chunky)

2 Granny Smith Apples, peeled and chopped

for the glaze:

1 1/2 cups confectioner’s sugar

3 tablespoons water

1 teaspoon vanilla extract

Preheat the oven to 350 degrees Fahrenheit. Line the bottom of an 8-inch round pan with parchment paper. Grease and then flour the pan and parchment paper.

Using an electric stand or hand mixer, beat the butter until creamy, about 1 minute. Add the brown sugar and beat again until creamy. Scrape down the sides of the bowl. Add the egg and honey and beat until combined.

In a separate bowl whisk together the flour, baking soda, salt, cinnamon, cardamom and nutmeg.

Add the dry ingredients to the wet, beating together until combined. Scrape down the sides of the mixing bowl. Add the applesauce and beat again. Scrape down the bowl and stir in the chopped apples.

batter in the pan
Apple-applesauce cake batter ready to be baked

Spoon the batter into the prepared cake pan and smooth out the top. You want the batter to be evenly distributed.

Bake for 50 minutes or until the cake appears firm and a cake tester or toothpick inserted into the center comes out clean. After 35 minutes you may need to cover the top with foil so that the cake doesn’t brown too much.

Cool for 5 minutes on a wire rack before removing the cake from the pan and allowing it to cool completely. After it has cooled completely, you can make the glaze for the cake.

To make the glaze, whisk together the water, vanilla and confectioner’s sugar. Pour it over the top of the cake. Allow it to set slightly before serving.

corn noodle soup

My Mom’s Chicken Noodle Soup/My Corn Noodle Soup

chicken noodle soup

Although my mother hated to cook, she did have a few dishes that she almost enjoyed making, ones that I truly enjoyed eating. Top on that list was chicken noodle soup. Brimming with plump egg noodles, tender chunks of chicken and colorful bits of carrots, this velvety soup was the epitome of comfort food.

For years I asked for my mother’s chicken noodle soup recipe. I even gave her various ways to share it. She could recite the ingredients and measurements; I’d write them down. She could make the soup as I watched; I’d take notes while she cooked. Invariably, she would be too busy, in no mood to cook or not have the ingredients. However, if I wanted to take a few containers of frozen chicken noodle soup that she happened to have on hand, well, that would be fine.

handwritten recipe
My mom’s handwritten recipe for chicken noodle soup

It took me a while to realize that she wanted to make this soup for me. Giving away the recipe would be giving away this gift forever. She was not about to do that. It was only when I reached my late 20s and she had reached the late stages of cancer that she wrote down and sent the recipe to me. I still have it tucked into the dog-eared pages of her Better Homes and Garden Cookbook.

Two soups, two recipes

Because my husband no longer eats meat, I have changed the original recipe quite a bit. Other than the presence of carrots, celery and onion—your classic mirepoix—and egg noodles, it has become a different dish. For the sake of comparison and for those who don’t eat meat, I’ve included both in this entry. Take a little comfort from them. Stay home! Stay well! Make soup!

My Mom’s Chicken Noodle Soup

Serves 6 to 8

3 skinless, boneless chicken breasts

1/4 cup chopped white onion

1/4 cup chopped celery

1/4 cup chopped carrots

1 teaspoon salt

2 cans cream of chicken soup

1 to 1 1/2 cups dried egg noodles

In a stockpot filled with boiling water, cook the chicken breasts for approximately 40 minutes, until fork tender or a digital instant-read thermometer registers 165 degrees Fahrenheit. Remove the chicken, allow it to cool slightly and then separate it into bite-sized pieces.

Place the onions, celery, carrots and salt in the cooking water/chicken broth and bring the ingredients to a boil. Cook for 30 minutes or until the vegetables are soft. At this point stir in the cans of cream of chicken soup. You also may need to add more water. You want this to be soupy and not overly thick.

Bring a separate pan filled with salted water to a boil. Add the egg noodles. Cook for 3 minutes. Drain the noodles and add them to the soup, stirring to combine. The noodles will finish cooking in the hot soup. Remove from heat. Wait 5 minutes and serve.

spoonful of corn noodle soup
Corn Noodle Soup featuring lots of corn and noodles

My Corn Noodle Soup

Makes approximately 2 quarts

2 quarts (8 cups) vegetable or chicken stock

1 (15-ounce) can of corn

1 tablespoon olive oil

2 celery stalks, trimmed and sliced

1 medium white onion, diced

2 carrots, peeled and diced

1 teaspoon salt, plus more to taste

5 cups frozen or fresh corn

1 1/2 cups egg noodles

In a large stockpot bring the vegetable or chicken stock to a boil. As the stock is heating, place the can of corn and its liquid into the bowl of a blender or food processor and blend until smooth. Add this to the stock.

Heat the olive oil in a small sauté or frying pan. Add the celery, onion and carrots and sauté until slightly softened, 2 to 3 minutes. Add the vegetables and corn to the stock. Allow the ingredients to cook over medium heat for 20 to 30 minutes, until aromatic and flavorful. If the soup has cooked down too much, add more water.

As the soup finishes cooking, bring a pan filled with salted water to a boil over high heat. Add the egg noodles and cook for 3 minutes. Drain, rinse and add the noodles to the soup. Stir the ingredients together, taste the soup and add more salt if needed. Serve hot.

lentil burgers with marinara

Mediterranean Red Lentil Burgers

lentil burgers with marinara

If you’re stocking up on dry goods, you’ve bought a bag of red or brown lentils, and now you don’t know quite what to do with them, I’ve got the dish for you—Mediterranean red lentil burgers. Although I make these velvety patties with dairy products and breadcrumbs, you could easily turn them into a vegetarian or gluten-free dish. Check out the recipe headnote for suggestions or adapt these lentil burgers yourself.

Delicious and nutritious

Lentils are one of my kitchen staples. I use them in soups and curries, as salads and as stuffings for fish and vegetables. Reputedly the oldest of all legumes, lentils have a wonderfully nutty flavor that goes well with a variety of ingredients. That includes carrots, peppers, onions, garlic, chicken, fish—particularly salmon, trout, Arctic char, swordfish, mahi mahi and scallops—and spices and herbs such as cumin, curry powder, paprika, basil, parsley, oregano, thyme, fennel and parsley.

Nutritious as well as delicious, lentils are high in iron and phosphorus and possess a decent amount of calcium and vitamins A and B. On top of these great traits, they have a long shelf life. Store them in their bag or an airtight container and they will last for a year. Talk about the perfect quarantine food!

baked lentil burgers
Lentil burgers hot from the oven.

How to cook lentils

Because lentils are dry goods, you will need to boil them before adding them to a recipe. First, I pick through the dried legumes, removing and discarding any shriveled ones. After that I give the lentils a quick rinse and tumble them into a large pan filled with lightly salted, cold water. After bringing the ingredients to a boil over medium-high heat, I reduce the temperature to medium and allow the lentils to bubble away for 25 to 35 minutes, adding more water if needed. When the lentils are finished, they will be plump and tender. Wondering about the dry to cooked ratio? Generally, 1 cup of dry lentils equals roughly 2 1/4 cups cooked.

Mediterranean Red Lentil Burgers

If you want to make vegetarian lentil burgers, replace the ricotta cheese with soft tofu, omit the Romano cheese, adding a pinch more salt to your burgers, and use an egg substitute. Note that, due to the shelter-in-place order, I have not tested the vegetarian version of this recipe. Please feel free to email me with corrections or exact measurements for the vegetarian/vegan substitutions.

Makes 18 burgers

2 cups uncooked red lentils, sorted and rinsed
4 large eggs, whisked together
1 1/2 cups ricotta cheese
1/2 cup grated Locatelli Romano cheese
3 cloves garlic, minced
1/4 cup chopped Italian flat leaf parsley OR 11/2 tablespoons dried parsley
1 1/2 teaspoons dried oregano
1/2 teaspoon dried marjoram
1 teaspoon sea salt
1/2 teaspoon ground black pepper
1 1/3 cup Panko breadcrumbs

boiling red lentils
Red lentils boiling until soft

Place the lentils in a pot filled with 6 cups of water and a pinch of salt. Bring the lentils to a boil over medium-high heat. Cook, uncovered for 25 to 35 minutes, until the lentils are soft. Remove the from the heat, drain, rinse with cold water and drain again.

Place the lentils in the bowl of a food processor or blender. Process until smooth.

About to mix the ingredients in Mediterranean red lentil burgers

Place the whisked eggs, cheeses, garlic, parsley, oregano, marjoram, salt and pepper in a large bowl. Add the processed lentils. Using a spatula or heavy spoon, stir the ingredients together until well blended. Add the Panko breadcrumbs and stir again until combined. Set the bowl aside and allow the ingredients to rest for 30 minutes.

Mediterranean red lentil burger mixture

Preheat the oven to 400 degrees Fahrenheit. Line two baking sheets with parchment paper.

Burgers formed and ready to be baked
Lentil burgers ready to be baked

Using your hands and approximately 3 tablespoons of lentil mix, shape the mixture into a 1/2-inch-thick and roughly 4 inches in diameter burger patty. Place it on the parchment paper. Repeat these steps until all of the lentil mixture has been used.

Bake the lentil patties for 25 to 30 minutes, turning them over halfway through the baking time. When finished, the burgers will have golden crusts on both the tops and bottoms. Remove from the oven and serve.

If you’d like to skip the bun, top your burgers with tomato sauce, grated cheese and fresh parsley. Otherwise, serve on a bun and with your favorite condiments.

To freeze these burgers, wrap them in parchment paper and place them in a freezer bag.

Better than black and white cookies? Black and White Cake!

Think of Black and White Cake as a giant black and white cookie but so much better. Before moving to New York City, I had thought that the B&W cookie would become my guilty indulgence, my go-to sweet. A cake-like cookie with both vanilla and chocolate topping. How could I not love this New York speciality? And, yet, I don’t.

For 20 years I’ve tried countless bakeries’ takes on this cookie. Unimpressed, I’ve even baked my own. Each time I’ve had the same thought—it could be great as a cake but, as a cookie, it lacks the crispness, crunchiness or gooeyness that I enjoy. Rather than give up on this treat altogether, I tinkered around in the kitchen and came up with a luscious Black and White cake recipe.

From above the black and white cake looks exactly like the cookie.

The Black and White Cake differs from its inspiration in several ways. The most obvious is that it’s a moist layer cake and not a cookie. The second is the icing. The cookie is decorated with fondant, a stiff, glossy topping made from sugar, gelatin, glycerine, vegetable shortening and water. Meanwhile, velvety buttercream frostings cover the Black and White Cake. Lastly, I adore the cake version but I’ve yet to be won over by the iconic cookie.

Slice of black and white cake and a British bunny-reading-a-book cup of coffee

Black and White Cake

Similar to the B&W cookie, this cake possesses a tender texture that comes, in part, from the addition of corn starch.

Serves 10

for the cake:

1 stick (8 tablespoons) unsalted butter, at room temperature

1 cup plus 2 tablespoons granulated sugar

4 large eggs, separated, at room temperature

1/2 cup water

2 teaspoons vanilla extract

1 2/3 cup plus one tablespoon cake flour

1/4 cup corn starch

1/2 teaspoon salt

1 tablespoon plus 1 teaspoon baking powder

for the vanilla frosting:

1 1/2 sticks (12 tablespoons) unsalted butter, at room temperature

1 pound confectioner’s sugar, sifted

1/2 teaspoon vanilla extract

1/4 cup milk, at room temperature

for the chocolate frosting:

8 ounces semi-sweet morsels

1 1/2 sticks (12 tablespoons) unsalted butter, at room temperature

3/4 cup confectioner’s sugar, sifted

3 tablespoons cocoa powder

1/4 cup milk, warmed

To make the cake, preheat the oven to 350 degrees Fahrenheit. Butter and flour two 8-inch springform pans.

In a large bowl and using an electric hand or stand mixer, beat the butter until creamy, 1 to 2 minutes. Add the sugar and beat again until the mixture is light in texture and color. Scrape down the sides of the bowl and add the egg yolks, water and vanilla extract. Beat until well combined.

Sift together the flour, cornstarch, baking powder and salt. Add the dry mixture to the liquids and beat until well combined.

In a separate bowl and with an electric mixer beat the egg whites until stiff peaks form.

Egg whites about to be folded into the batter

Using a rubber spatula, gently fold the egg whites into the batter until combined. Spoon equal amounts of batter into the two prepared cake pans. Bake for 30 minutes or until a toothpick inserted into the cakes’ centers comes out clean.

Remove the cakes from the oven and allow them to cool on wire racks for 5 minutes. Invert the cakes onto the wire racks and gently remove them from their pans. Allow them to cool completely before icing them.

To make the vanilla frosting, beat the butter until creamy. Add the confectioner’s sugar, vanilla and milk and beat until the frosting is smooth. Set aside.

To make the chocolate frosting, place the chocolate morsels and 1/2 stick of butter in a bowl and microwave for 30 seconds. Remove, stir and microwave again until the morsels have melted and the butter and chocolate are blended. Set aside to cool.

In a small bowl whisk together the cocoa and milk.

In a large mixing bowl, place the remaining stick of butter. Beat with an electric mixer until creamy. Add the confectioner’s sugar and cocoa-milk mixture and beat until well blended. Add the cooled chocolate and beat again until smooth.

Cake with line faintly drawn down the center

To ice the cake, place one cake on a plate or cake stand. Using a knife, gently draw a line down the center of the cake. (See photo above). With an icing knife or spatula, spread chocolate frosting on one side of the line and vanilla frosting on the other side.

Alternate the icing so that each slice will have both chocolate and vanilla.

Set the second cake on top of frosted cake. Draw a faint line down the center of this cake. Spread the two frostings on either side of the line, this time reversing the frostings so that when the cake is cut, you’ll have a slice with both chocolate and vanilla icing. (See photo above.) You’ll then frost the sides of the cake so that they correspond with the top. Slice and serve.

big stack of Anzac cookies

Crunchy & Sweet Anzac Biscuits

Traveling through Australia and New Zealand’s South Island, I learned that Anzac biscuits are about as prevalent and popular as chocolate chip cookies are in the U.S. They’ve been around a bit longer, though. While chocolate chip cookies originated in the late 1930s, Anzac biscuits date back to World War I, when Australia and New Zealand established the Australian and New Zealand Army Corps, or ANZAC. Sent to Egypt for training, the ANZAC soldiers took along tins of sturdy and wholesome oatmeal biscuits. Hence the name “Anzac biscuits.”

Created without eggs, Anzac biscuits traveled well and possessed a long shelf life. These traits came in quite handy, because loved ones often mailed these cookies to the troops. The baked goods then spent two months on a ship without refrigeration before reaching the soldiers.

ANZAC Day

Inside the ANZAC Memorial in Sydney, Australia

Had it not been for the ANZAC troops’ efforts and sacrifices at Gallipoli, Turkey, their eponymous treats may have drifted into obscurity. However, as a result of the corps’ bravery during eight months of fighting, Australia, New Zealand, Tonga, Samoa and the Cook Islands all celebrate ANZAC Day. Held on April 25, the first day of the Gallipoli campaign, this day of remembrance includes the baking and consuming of Anzac biscuits. Placed in decorative tins, the sweets are also sold to raise funds for military veterans and, during wartime, war efforts. 

Early recipes include golden syrup

According to New Zealand’s National Army Museum, a reference to Anzac biscuits first appeared in print there in 1921. The traditional recipe consisted of rolled oats, flour, sugar, butter and golden syrup. The last ingredient, golden syrup, may not sound familiar to American ears, but it’s a common ingredient in British and some Oceanic dishes. Made by refining cane sugar or beet sugar juice, golden syrup — or light treacle as it’s also known — possesses a rich, slightly caramel flavor and smooth, viscous texture similar to honey or corn syrup.

stack of anzac cookies
Big stack of Anzacs

Minor alterations to the Anzac biscuits recipe

If you can’t track down golden syrup, you can substitute light corn syrup. Because Anzac biscuits require so little golden syrup, I use honey instead of the corn syrup alternative. In this recipe, the difference is negligible.

Another option is to include shredded coconut. Some bakers add it to this simple batter. Others don’t. I find that sweetened shredded coconut brings complexity and a richer flavor to the biscuit. If you’re not a coconut fan, feel free to omit it.

anzac biscuits about to be baked
Anzac biscuits waiting to be baked

What you shouldn’t change is the low temperature and longer baking time demanded by these sweets. By keeping the oven thermometer at 325 F and baking the Anzacs for roughly twice as long as you would oatmeal or chocolate chip cookies, 20 minutes versus 8 to 12 minutes, you end up with the crispness and hardiness for which the biscuits are famed.

Anzac Biscuits

When stored in an airtight container in a cool, dry place, Anzac biscuits will keep for a minimum of three weeks. When bundled in plastic wrap, sealed in airtight, plastic bags and frozen, they will last for at least three months.

 Yields: 3 dozen cookies 

Ingredients

1 ½ cup all-purpose flour

1 1/2 cup rolled oats

¾ cup firmly packed light brown sugar

¾ cup sweetened shredded coconut

Pinch salt

10 tablespoons unsalted butter

1 1/2 tablespoons honey

3/4 teaspoon vanilla

1 1/2 tablespoons boiling water

3/4 teaspoon baking soda

Directions

Preheat the oven to 325 F. Line two baking sheets with parchment paper.

Sift the flour into a large bowl. Add the oats, brown sugar, coconut and salt and toss to combine.

In a small saucepan, melt the butter over medium heat. Whisk in the honey and vanilla and remove the pan from the heat.

Combine the boiling water and baking soda in a small bowl and stir together. Pour the water mixture into the butter mixture and stir together. Note that combining the two liquids will cause them to foam up. 

Make a well in the center of the dry ingredients and pour the liquids into this. Stir the wet and dry ingredients together until a well-combined, crumbly batter forms. 

Using a tablespoon, measure out equal amounts of batter and place each tablespoonful onto the parchment-lined baking sheet. Leave roughly 1 inch between each cookie.

Bake for 20 minutes, until the biscuits have browned. Remove them from the oven and cool for 10 minutes before placing them on wire racks to cool completely. Store in airtight containers.