Latest Posts

What to Do with Wineberries? Wineberry-Orange Gelée!

WINEBERRIES

A GORGEOUS SUMMER TREAT, WINEBERRIES

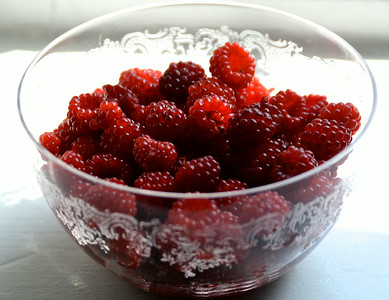
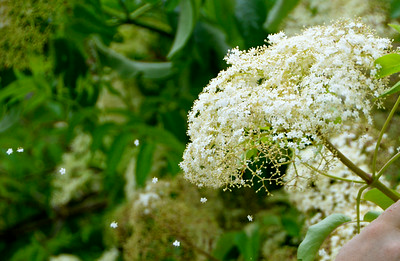
This seems to be my summer for foraged foods found on my friends Frank and Jane’s farm. First it was elderflowers. Now it’s wineberries. Never heard of wineberries? Until a few weeks ago, I hadn’t either. What I had done, though, was nibble on the small, scarlet, raspberry-like fruit on countless walks through the woods.

Introduced to American soil in the 1890s, the prickly wineberry shrub flourishes along roadsides, in forests and fields and any other place with moist soil and moderate sunlight. Hence why I’ve encountered them on hikes and in thickets around Frank and Jane’s farm. The shrub’s firm, juicy berries resemble raspberries in flavor and appearance. They are, in fact, a type of raspberry. Their scientific name, Rubus phoenicolasius, means ‘raspberry with purple hairs,’ undoubtedly a reference to the hairy stems to which the berries cling.
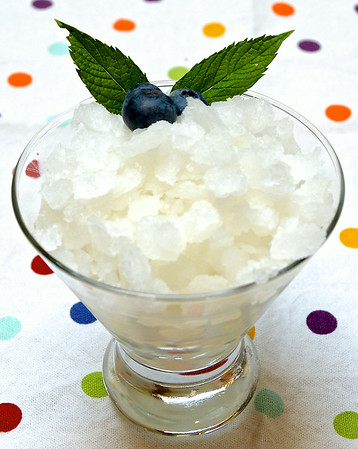
WINEBERRY GELEE

WINEBERRY GELÉE

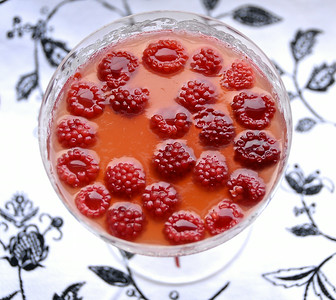
Bestowed with a bowl of these little berries, I wanted to use them in a dish that would show off their beautiful color and compact size. Putting them in a cake, pie, crumble or ice cream would just turn them to mush. A gelée, however, wouldn’t interfere with their pert shape and ruby redness.

WINEBERRY GELEE

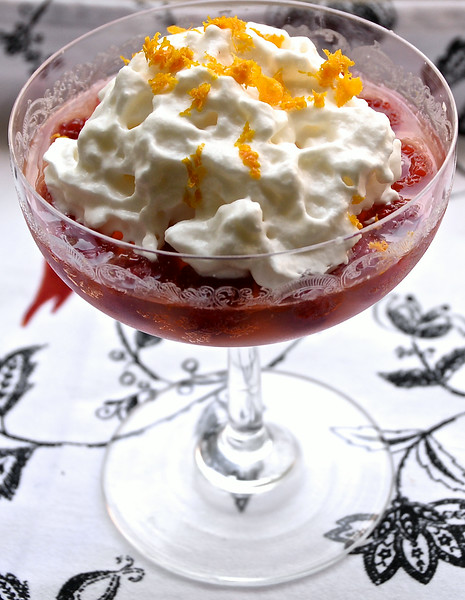
WINEBERRY-ORANGE GELÉE TOPPED WITH WHIPPED CREAM AND ORANGE ZEST

A French, gelatin-based specialty, gelée often features champagne or fortified wine as an ingredient. The following recipe for Wineberry-Orange Gelée does not. This makes it more family-friendly but also more of a gelatin than a true gelée. When craving authenticity, I’d replace the water with champagne.

WINEBERRY-ORANGE GELÉE
If you don’t have access to wineberries, you can substitute raspberries or blackberries in this recipe.

Serves 6

1 1/4 cup fresh wineberries, rinsed
1/4 cup sugar
1 tablespoon lemon juice
2 (.25 ounce) envelopes of gelatin
1 cup water, divided
Juice of 6 oranges (about 2 cups)
Grated zest of 2 oranges
1/2 cup granulated sugar
Juice of 1 lemon
Whipped cream, optional, for serving

Place the washed berries in a bowl with the sugar and lemon juice and toss to combine. Allow the wineberries to macerate for 30 minutes.

Pour half of the water into a small bowl and sprinkle the gelatin over top. Let the two steep for 5 minutes.

Place the orange juice, sugar, juice of 1 lemon and remaining water in a large saucepan. Bring the ingredients to a boil over medium heat, stirring until the sugar has dissolved. Remove the pan from the heat and add the gelatin mixture. Stir again until the gelatin has dissolved.

Strain the liquid from the berries and add this to the pan. Stir to combine.

Pour equal amounts of gelatin into six decorative glasses or bowls. Spoon an equal number of wineberries into each glass. Refrigerate for a minimum of 3 hours or maximum of 2 days. Before serving, decorate each with the optional whipped cream and orange zest.

Oh-So-Elegant Elderflower Granita

ELDERFLOWER GRANITA

ELDERFLOWER GRANITA DRESSED WITH BLUEBERRIES AND MINT

At one time, when I heard “elderflower cordial,” I imagined garden parties in the English countryside where formally attired guests sipped pale yellow drinks from elegant crystal goblets. In reality not once in my half dozen trips to England has anyone ever invited me to or mentioned attending such a soiree. Been offered a glass of chilled elderflower cordial? Nope. That hasn’t happened either.

Until a few weeks ago I hadn’t thought much about consuming or even picking elderflowers. Then two old friends mentioned that they were making elderflower cordial from their farm’s elderberry trees. With that my visions of genteel garden parties and fancy drinks returned and I became intrigued by the flower’s culinary possibilities.

ELDERFLOWERS

DELICATE ELDERFLOWERS FLOATING AWAY FROM THEIR STEMS

Found throughout Europe, North America and Western Asia, elderberry trees bear clusters of tiny, edible, white flowers and small, blackish-purple berries. The latter get made into chutneys, jams, jellies, sauces, soups and wine while the former show up in cordials, teas, jellies, baked goods and, oddly enough, fritters. As you might expect, elderflowers impart a pleasant floral flavor to these foods.

When mixed with boiling water and sugar and allowed to steep for at least 24 hours, elderflowers transform into elderflower syrup. Add citrus juice and zest and seltzer or water to the syrup and you have the sweetly tart and flowery drink known as elderflower cordial. That is all it takes to create my romanticized drink.

Yearning to try this idealized beverage, I made a weekend trip to my friends’ farm and collected enough flowers for a batch of cordial. On the way home I started thinking about what else I could do with these little gems. Why stop at a cordial when I could stir up an exquisite elderflower granita?

ELDERFLOWER GRANITA
Makes 4 cups

If you cannot find fresh elderflowers, you can use commercially produced elderflower cordial. IKEA, among others, carries this. If you do use fresh flowers, be sure to rinse them thoroughly and remove any bugs or debris from them.

For a refreshing summertime drink, add the leftover cordial to water, plain seltzer, white wine or vodka.

for the cordial:
2 cups water
2 1/4 cups granulated sugar
2 cups fresh elderflowers, well-rinsed and drained
Zest and juice of 2 lemons
1 orange, sliced

for the granita:
2 cups elderflower cordial
2 cups water
Juice of 1 lime
Fresh mint, optional, for garnish
Fresh blueberries or black raspberries, optional, for garnish

To make the cordial, place the water and sugar in a medium saucepan and, over medium heat, bring the ingredients to a boil. Cook, stirring occasionally, until the sugar has dissolved. Add the elderflowers, stir to combine and remove the pan from the heat. Pour the liquid into a large glass bowl and cool slightly.

Add lemon juice and zest and orange slices and stir the ingredients together. Loosely cover the bowl and place it in a cool spot. Periodically stirring the mixture, allow it to steep for 24 to 36 hours.

When the cordial has reached its desired strength, strain it through a fine mesh or cheesecloth-lined colander and into a pitcher. Discard the flowers, orange slices and lemon zest. Using a funnel, pour the cordial into lidded jars or bottles. Refrigerate until you’re ready to make the granita.

To make the elderflower granita, pour 2 cups cordial, 2 cups cold water and the lime juice into a shallow pan or bowl and stir to combine. Place the pan in the freezer for a minimum of 8 hours. For the first 2 hours, remove the pan every 20 to 40 minutes and stir the contents, making sure to scrape down the sides of the dish and incorporate both the iced and still-liquid granita.

Once the granita is completely frozen, use a large spoon to scrape the top to form a single serving. Place the granita in a cocktail glass or bowl and enjoy.

Sweet & Nutty Couscous

SWEET COUSCOUS

DRIED FRUIT- AND ALMOND-STUDDED SWEET COUSCOUS

Summertime on the East Coast, when every muggy day feels like a day spent in the tropics. Whenever sultry weather strikes, I dig out my growing stack of limited-cooking-required recipes. Most of these dishes have their roots in warmer climates where, like me, cooks try to keep the amount of heat in the kitchen to a minimum.

On the top of that stack is a beloved Moroccan specialty, sweet couscous. Dotted with iron-rich dates, dried cranberries, dried apricots and toasted almonds, this grain-based favorite offers an assortment of sensory thrills. The sharp snap of the almonds provides a pleasant, and audible, change from the velvety softness of the steamed fruits and couscous. It also gives me a chance to toss all the ingredients into one pot and steep them for five minutes before serving. Tasty and requiring limited cooking, it’s a treat that can’t be beat!

Traditionally, making couscous involves intermittently steaming the grains in a two-tiered pot known as a couscousiere, wetting down, and then separating the grains with your fingers. It’s a process that takes close to an hour. On balmy, time-pressed evenings, a saucepan and a cup of instant couscous serve as fine substitutes.

As cringeworthy as my videography may be, I’ve included a brief clip on how to use a couscousiere. I also explain why this tool falls into the category of regrettable souvenirs. Bear with me on this one. As time goes by, the videos will improve.


SWEET & NUTTY COUSCOUS
Along with serving Sweet & Nutty Couscous for dessert, I like to cover and refrigerate this dish overnight and then eat it chilled for breakfast. It’s delicious on its own but also tastes wonderful when spooned over Greek yogurt.

1 cup plus 2 tablespoons water
1 cup dried couscous
1/3 cup dried cherries
1/3 cup dried apricots, chopped
3 tablespoons dried dates, chopped
1-inch vanilla bean
1/4 cup blanched almonds, toasted and roughly chopped
1 tablespoon butter
1/3 cup honey
Greek yogurt, optional, for serving

In a medium saucepan, boil the water. Add the couscous, cherries, apricots and figs. Using a knife, split open the vanilla bean and scrape the seeds into the saucepan. Stir the ingredients together, cover the saucepan and remove from heat. Let stand for 10 minutes.

In a large bowl, combine cooked couscous and butter. Rake your fingers through the couscous, loosening the grains and incorporating the butter with the fruit.

Pour in the honey and gently stir. Add the toasted almonds and blend again. Serve the couscous on its own or over plain or vanilla-flavored Greek yogurt.

Scrumptious Fruit Scones

SCONES

SCONES AT OTTOLENGHI IN LONDON, ENGLAND

I love my morning ritual of coffee and whole grain toast with peanut butter and preserves. Yet, as soon as I step onto British soil, I ditch this duo for a pot of hot, black tea and a rich, slightly sweet fruit scone. Loosely defined as a small, soft, plain cake, the scone is a staple of afternoon tea. If you can track down one that’s warm and fresh from the oven, it’s also a heavenly, albeit filling, breakfast treat.

Although I think of scones as quintessentially English, they’re actually a Scottish specialty. Depending on whom you talk to, their name comes from the ceremonial Stone of Destiny at Scone Abbey in Scotland or from the Scots term “sconbrot,” meaning fine white bread. Originally made from oats and triangular in shape, they were fried on a griddle. Today flour-based scones come in a variety of shapes and are baked. While I prefer plump, dark raisins in mine, they can be either sweet or savory.

RAISIN SCONES

RAISIN SCONES IN YORK, ENGLAND

Among the lovely things about scones is how fast and easy they are to make. Give me ten minutes and I can mix and bake a batch for you. They are a quick bread.

If your first attempts at homemade scones resemble hockey pucks, you’ve probably baked them for too long. After five minutes peek inside the oven to ensure that they aren’t becoming overly brown or are cooking unevenly. Rotate the baking sheet and allow them to bake for another two to four minutes before removing and serving.

When stored in an airtight container, homemade scones last three days. In truth, they’re at their best when eaten hot from the oven with a smear of butter or clotted cream.

SCRUMPTIOUS FRUIT SCONES
Consider this your template for making an assortment of dried fruit scones. Currants, dried cranberries, dried cherries, diced dried apricots or diced fresh pears would be good replacements for raisins in the following recipe.

Makes 6 scones

1 2/3 cup all-purpose flour
2 teaspoons baking powder
1/2 teaspoon salt
1/4 cup cold, unsalted butter, diced
1/3 cup plus 1 tablespoon raisins
1/3 cup granulated sugar
1/2 teaspoon vanilla extract
1/2 cup buttermilk
1 egg, beaten, for brushing over the tops

Preheat the oven to 450 degrees Fahrenheit. Line a baking sheet with parchment paper and set aside.

Sift the flour, baking powder and salt into a large bowl and whisk together. Using your fingers, rub the butter into the flour until it resembles coarse breadcrumbs. Add the raisins and sugar and stir to combine.

Make a well in the center of the mixture. Whisk together the vanilla and buttermilk. Pour in the buttermilk into the well and stir the ingredients together until a soft dough forms.

Lightly flour a clean work surface. Place the dough here and gently knead it for 10 to 20 seconds. Over-kneading will make the scones more like bread, less like scones. Using a lightly floured rolling pin, roll out the dough to about 1-inch thick. Cut the dough into rounds using a flour-dusted, 2 1/2-inch biscuit cutter.

Place the scones on the parchment-lined baking sheet. Brush the tops with the beaten egg and then bake for 7 to 10 minutes, checking after 5 or 6 minutes to ensure that they’re baking evenly. When finished, they will be plump and golden on top. Remove and serve warm.

white chocolate almond cake

Flourless & Fabulous White Chocolate Almond Torte

A slice of white chocolate almond torte

When baking, I often think of my late mother from whom I inherited a raging sweet tooth. I suspect that she received hers from her own mother with whom she spent countless Friday nights making candy, cakes and other confections. They had baked for fun from recipes passed down through my French grandmother’s family and plied all whom they knew with these goodies. Yeah, I inherited that latter trait, too.

Among the wonderful treats that they made were tortes. Although it may sound quite sophisticated, a torte is simply a single layer cake made with flour and/or ground nuts. German in origin, it’s occasionally filled jam or buttercream. In my kitchen it’s adorned with fresh, seasonal fruit and confectioner’s sugar.

Six ingredients in white chocolate-almond torte

White chocolate-almond torte requires only six ingredients

One of the many great things about White Chocolate Almond Torte is how few ingredients are used. As the name indicates, you’ll need white chocolate and ground almonds as well as eggs, butter, sugar and almond extract. That’s it.

freshly baked white chocolate almond torte

Hot-from-the-oven torte

I have made the following flourless White Chocolate Almond Torte so many times that I could do it blindfolded or in my sleep. Take your pick. As time passes, I’ve learned that, if you bake the cake a day in advance, sprinkle the sugar over top and then cover the cake for 24 hours, it becomes even moister, more honeyed and more delicious.

To bake this cake, you’ll need a 9-inch springform pan and round parchment paper. I know, it’s a pain to buy and house more kitchen equipment. However, an inexpensive springform pan ensures that you’ll keep this dense, damp cake in one piece. Trust me. It’s worth nine to twelve dollars not to have your freshly baked torte split in half as you remove it from the pan.

The finished torte

WHITE CHOCOLATE ALMOND TORTE

When I bake this cake in the winter, I top it with pomegranate seeds.  In spring, summer and fall I dress it with a mix of seasonal berries.

Serves 8

1/2 teaspoon granulated sugar
1 1/2 cup blanched almonds
10 tablespoons unsalted butter, at room temperature
1/3 cup granulated sugar, divided
6 large eggs, separated
7 ounces white chocolate morsels, melted
2 teaspoons almond extract
Confectioner’s sugar, for dusting
4 cups mixed seasonal berries

Preheat the oven to 350 degrees Fahrenheit. Grease and line a 9-inch springform pan and set aside.

Place the half teaspoon of granulated sugar and blanched almonds in the bowl of a food processor and pulse until ground. Set aside.

Using an electric mixer, beat the butter until smooth and light in color, 2 to 3 minutes. Scrape down the sides of the bowl and add half of the 1/3 cup sugar. Continue beating until fluffy, 1 to 2 minutes. Scrape down the sides of the bowl and then add the egg yolks one at a time, beating well and scraping down the bowl after each addition.

The golden mixture of egg yolks, butter and sugar.

Spoon in the melted chocolate and beat until well combined. At this point add the ground almonds and almond extract and beat until combined.

In a separate bowl and using an electric mixer, beat the egg whites until soft peaks form. Add the remaining sugar and beat until stiff, glossy peaks form.

Using a rubber spatula, fold the egg whites into the nutty batter. Don’t over-mix; you want the batter to be airy yet chunky. Evenly spread the mixture in the springform pan.

batter in the springform pan

Batter spread out in the springform pan

Bake for 45 to 50 minutes, until the cake starts to separate from the sides of the pan. Remove the cake from the oven and allow it to cool in the pan for 15 minutes. Remove it from the pan and place it on a wire rack to cool completely.

Before serving dust the top of the cake with confectioner’s sugar. Sprinkle the fruit over the sugar and then dust again.


A Few Thoughts on Caviar

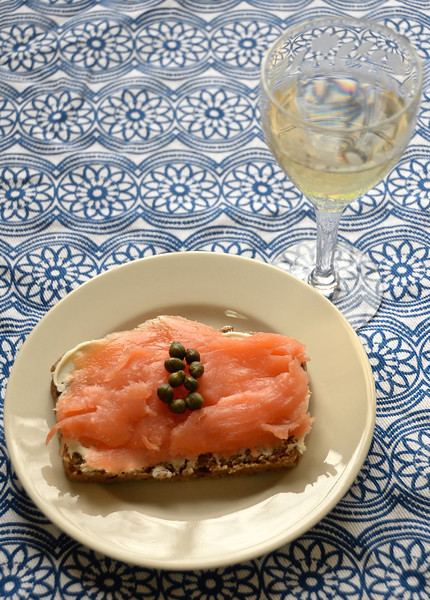
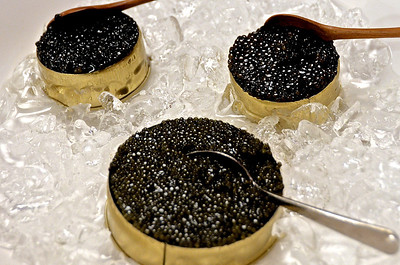
Caviar is one of those foods that we’re supposed to love. Costly and rare, it’s considered the height of luxury and sophisticated dining. Receive a complimentary blini topped with a dollop of creme fraiche and sprinkling of tiny, flame-colored, salty orbs and you might think, “Wow! Caviar! This restaurant knows how to make its diners feel special!” Then again, you might also think, “Gross. Fish eggs.”

For years I’ve felt neutral about caviar. More often than not, I’ve consumed tough, gritty, low quality roe, the stuff that makes people say, “Eew. Fish eggs.” On very rare occasions I’ve sampled the luxurious, melt-in-your-mouth delicacy that makes people drool. Two weeks ago I had the latter experience when sent on a mission to obtain caviar for a friend’s Scandinavian-themed party.

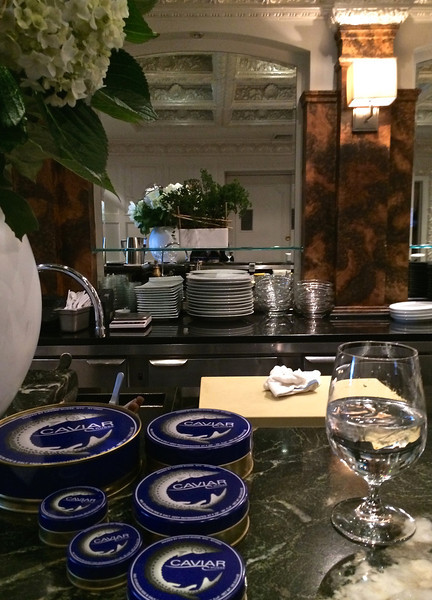
Dressed in my workday uniform of jeans, black sweater, faded black t-shirt and running shoes, I schlepped over to Caviar Russe in Midtown. Up the marble staircase I climbed, with each step wondering if I shouldn’t have worn something slightly nicer or cleaner. Seriously, what had I stepped in on my way over here? Greeted by staff wearing suits and ties, I realized that I might be the grubbiest person ever served there.

Fashion faux pas aside, tasting roe at Caviar Russe proved fairly enlightening. I learned that with caviar, you do get what you pay for. The moderately priced caviars were pleasant but no match for the pricey ossetra, which was smooth, nutty and otherworldly. Similar to the prized beluga, ossetra comes from sturgeon.

I also discovered that these petite eggs glide off a mother of pearl spoon but stubbornly cling to wood and stainless steel. In the past I’d been told that you serve caviar on mother of pearl so that no other flavors taint the eggs. So much for that theory. I likewise confirmed what I’d long suspected—caviar is a precious treat, one that, due to cost and issues of sustainability, should be consumed sparingly.

SAUTEED SHAD ROE
From Fish Market (Running Press, 2013)
Serves 4

Sautéed roe is one of those delicacies of the past rarely encountered in the present. Note that you’ll need a roe mass/roe still covered in membrane. Can’t find this essential ingredient? You can always buy a tin of salmon or trout roe and sprinkle the caviar over hors d’oeuvres, salads or pasta.

12 ounces shad roe
1/2 stick butter
2 tablespoons freshly squeezed lemon juice
Salt, to taste
White pepper, to taste

You’ll begin by melting the butter in a nonstick frying pan over medium heat. Swirl it around the pan and then add the roe.

Cook the roe on one side until lightly browned, about 3 minutes. Turn over and allow the other side to brown, about 3 minutes. When finished, the centers should look pink.
Remove the roe from the pan. Add the lemon juice to the remaining butter in the pan and whisk together over medium heat for 1 minute. Pour the liquid over the roe and season with salt and white pepper. When finished, you’ll have enough to serve 4.

Apple Pie Aquavit

AQUAVIT

SO SCANDINAVIAN. AQUAVIT & GRAVLAX ON DANISH BROWN BREAD

The word aquavit means “water of life” and for Scandinavians that definition holds pretty true. In Denmark no traditional lunch or smørrebrød (open-face sandwich) would be complete without a shot of chilled ‘akvavit’ followed by a cold beer. A common accompaniment to the country’s beloved pickled herring, this potent liquor reputedly aids in digestion. In Sweden it’s known as “snaps” and downed in one gulp with beer and drinking songs to follow. In Norway it’s sipped alongside the evening meal.

What is aquavit? It’s a potato- or grain-based vodka infused with caraway seeds. Caraway not your thing? Take heart — depending upon the region and distiller, dill, fennel, coriander seeds or star anise may stand in for the customary spice.

POTATO VODKA

INGREDIENTS FOR APPLE PIE AQUAVIT

Warned by Swedish friends of the high cost of alcohol in their homeland, my first taste of aquavit came courtesy of a hastily purchased sampler pack at Arlanda Airport. Pulling out one of the tiny bottles and twisting off its cap, I took a swig of the clear liquid and shuddered. It was horrendous. In fact, it was so pungent and overpowering that I wondered if someone had tricked me into drinking rubbing alcohol. After this inauspicious introduction I consumed all future shots in polite sips and with a beer chaser.

APPLE PIE AQUAVIT

APPLE PIE AQUAVIT STEEPING IN A JAR

This weekend I’m heading to a party where guests bring and sample homemade aquavit. In the past people have experimented with such unorthodox infusions as blueberry, peanut butter and jelly, and bubblegum. Although purists may scoff at untraditional flavorings, to me, they are worlds better than the spice-laced original.

Keeping palatability in mind, I’ve made Apple Pie Aquavit. Using two apples, a cinnamon stick, vanilla bean, whole nutmeg and, of course, vodka, this creation smells like a boozy apple pie. Sweetened with a few tablespoons of simple syrup, it tastes a bit like that, too. An authentic Scandinavian aquavit? Nope. A delicious drink? You bet!

APPLE PIE AQUAVIT/AKVAVIT
Makes 32 ounces
Note: Takes 7 to 10 days to infuse

1 inch cinnamon stick
1 inch piece of vanilla bean, split
3 3/4 cups potato-based vodka
2 large Granny Smith apples, peeled and diced
1 whole nutmeg
1 to 3 tablespoons simple syrup

for the simple syrup:
1/4 cup granulated sugar
2 tablespoons water

Place the cinnamon stick and vanilla bean in a piece of cheesecloth, tie them into a small bundle and put that in large, tight sealing, glass canister or mason jar. Add the vodka and diced apples, seal and shake the ingredients together.

Store the steeping vodka in a cool, dark spot for 5 days, shaking the ingredients together 2 or 3 times per day. On the fifth day add 1 whole nutmeg to the jar and shake again.

Depending on how flavorful you’d like your aquavit to be, you can continue steeping the mixture for another 2 to 5 days. Once you’ve achieved the desired taste, you will need to make the simple syrup to sweeten the aquavit. Simmer 1/4 cup sugar and 2 tablespoons water in a small saucepan until the sugar has dissolved completely and the liquid has thickened slightly but is still clear in color. Remove from heat and cool to room temperature.

Strain the aquavit through a fine mesh strainer or chinois and into a large bowl. Add 1 tablespoon of simple syrup and whisk to combine. Taste and add more simple syrup if desired.

Using a funnel, pour the aquavit into a bottle, cover and refrigerate until ready to consume.

My Favorite Chocolate Chip Cookie

If you’ve dropped by Kitchen Kat more than once, you’re probably aware of my insatiable sweet tooth. Pies, cakes, candies and tarts. I love and make them all. What you might not know is that I am perpetually on the lookout for the perfect chocolate chip cookie. From Amy’s Bread, Birdbath, Levain and Jaques Torres to the less pricey offerings at Jack’s and Insomnia and the vegan version at Joe I’ve tried them all. You name the bakery or recipe. I’ve eaten the cookie.

Last summer, while in the thick of promoting Fish Market, I came across what may be the best chocolate chip cookie that I’ve ever had. Crisp, sweet, aromatic and with just a hint of spiciness, it was the cookie that I’d been craving. This divine treat came not from a professional bakery or The Joy of Cooking but from my friend Elizabeth’s sunny kitchen. I took a bite of one, devoured it and then reached for another and another and another. Before I knew it, I was covered in cookie crumbs and running late for a signing at Browseabout Books.

cookie ingredients

Ingredients for my favorite chocolate chip cookies

Earlier this month I visited Elizabeth at her Annapolis home where she made another batch of her fabulous cookies. This time she walked me through the process and shared tips for creating these crunchy, flavorful confections. Lucky me! Lucky you, too, for this week I’m passing along her recipe.

Before you get started, keep in mind a few of Elizabeth’s tricks. Beat your butter a little longer than you normally would before adding the sugar; you want it to be light in color and airy in texture. Regarding the sugar, use dark, rather than light, brown sugar; this adds a subtle richness and complexity to each bite. If you don’t want to eat all the cookies at once as I’m tempted to do, drop spoonfuls of the dough onto a parchment-covered baking sheet and freeze them overnight. You can then pop two or three frozen dough balls into your preheated toaster or conventional oven. They’re a quick, luscious sweet to enjoy after work, with friends who unexpectedly stop by or, in my case, anytime.

putting cookie dough on a baking sheet

Spooning the cookie dough onto a baking sheet

ELIZABETH T’S CHOCOLATE CHIP COOKIES
Makes 4 dozen

2 cups plus 3 tablespoons all-purpose flour, plus more as needed
1 teaspoon baking soda
1 teaspoon ground cinnamon
1 teaspoon ground ginger
2 sticks unsalted butter, softened
3/4 cup granulated sugar
3/4 cup firmly packed dark brown sugar
1 teaspoon vanilla extract
2 large eggs
1 3/4 cup semi-sweet morsels

Preheat the oven to 375 degrees Fahrenheit. Line two baking sheets with parchment paper and set aside.

In a large bowl sift together the flour, baking soda, cinnamon and ginger. Set aside.

Using an electric mixer and large mixing bowl, beat the butter until light in color and fluffy in texture, about five minutes. Add the sugars and vanilla and beat until creamy. Add the eggs one at a time and beat until combined.

Add the sifted flour, baking soda, cinnamon and ginger and beat until well-combined. At this point, if you find the dough to be too sticky or if you prefer cake-like cookies, add another tablespoon or two of flour and beat until incorporated. Otherwise, stir in the chocolate chips.

Spoon rounded teaspoons of dough onto the baking sheets, leaving about 2 inches between each cookie. Bake for 10 to 12 minutes, until the cookies are firm and golden brown. Allow the cookies to cool for 1 to 2 minutes on the sheets before placing them on wire racks to cool completely. Repeat with the remaining dough until all the cookies are made.

Irish potato candy

Philly Irish Potatoes for St. Paddy’s Day

Irish potatoes

Rows of Irish potatoes

Look up “Irish potato” in Herbst’s Food Lover’s Companion and you’ll find it defined as “a round, white, thin-skinned potato . . . good for boiling, frying and pan-roasting.” Ask for an Irish potato in Philadelphia and in all likelihood you’ll be handed a small, cinnamon-dusted, spud-shaped candy.

A Philly original from the early 20th century, this sweet reputedly was created by Irish immigrants for St. Patrick’s Day. In spite of its name there is not a trace of potato in this confection. Its moniker comes from its oblong shape, white center and dusky skin.

Ingredients for Irish potato candy

What you need to make Irish potatoes

What’s in an Irish potato? Cream cheese, butter, coconut and lots of powdered sugar. If you don’t like intensely sweet treats, you’ll want to steer clear of this little guy. Even I, the queen of sugar, find some versions too cloying.

To boost the sweetness even more, many flavor their Irish potatoes with a generous dose of vanilla extract. Since I have a surplus of Bailey’s Irish Cream on hand, I cut back on the extract and add a tablespoon of liqueur to the mix.

Irish potato batter

A bowlful of Irish potato ‘batter,’ ready to be shaped into its familiar form.

Once all the ingredients have been whipped together, the creamy mixture is shaped into tiny potatoes–I think of them as candied tater tots–and rolled in cinnamon. In the following recipe I dust my Irish potatoes with either unsweetened cocoa or sweet ground chocolate. Both go better with the Bailey’s-laced filling than the traditional cinnamon coating.

COCOA-DUSTED IRISH POTATOES
Makes about 4 dozen 1-inch potatoes

4 tablespoons unsalted butter, at room temperature
4 ounces cream cheese, at room temperature
1 tablespoon Bailey’s Irish Cream
1/4 teaspoon vanilla extract
1 pound confectioner’s sugar
8 ounces sweetened coconut flakes
3 tablespoons unsweetened cocoa powder
3 tablespoons sweet ground chocolate

Using either an electric mixer or spatula, beat together the butter and cream cheese until smooth. Add the Irish cream and vanilla extract and beat until incorporated. Add half of the confectioner’s sugar and beat together until well combined. Repeat with the remaining sugar and then add the coconut flakes, beating until combined.

Place the cocoa powder and ground chocolate on 2 separate plates.

Using your hands, take 1 to 2 teaspoons of coconut cream and roll it into a small, oblong “potato.” Roll the potato in either the cocoa powder or ground chocolate and place it on a plate or in an airtight container. Roll and then coat the remaining filling, dusting half of the Irish potatoes with cocoa powder and the other half with chocolate. Cover the potatoes and refrigerate until ready to consume.

Note that, if stored in an airtight container and refrigerated, Irish potatoes will keep for up to 2 weeks.

The Scoop on Mushroom Barley Soup

Another week of blustery weather can mean only one thing — more soup simmering on my stovetop. This time it’s my take on an old family recipe for Scotch broth. One of Scotland’s most famous offerings, Scotch broth begins by boiling together chunks of mutton or beef and barley. Eventually, diced root vegetables and parsley are added to the pot. A sprinkling of fresh parsley then finishes it off.

Unlike classic Scotch broth, my version replaces the meat with mushrooms, making it less stew-like. In essence, this is a hearty mushroom barley soup.

With its vegetable stock base and abundance of barley, root vegetables and mushrooms this soup could be considered a vegetarian-friendly dish. For a bona fide vegan meal, substitute olive oil for the butter.

MUSHROOM BARLEY SOUP
To get the requisite 2 cups cooked barley, you will need to bring 2 cups water, 1/2 cup pearl barley and a pinch of salt to a boil over high heat. Cover, reduce the heat to low and allow the barley to simmer for 40 minutes. By this point the barley will have plumped up and absorbed most of the water. Any remaining liquid can be drained off.
Serves 8

3 tablespoons unsalted butter
1 leek, whites and 1-inch greens chopped
2 cups cremini mushroom caps, chopped
6 cups vegetable stock
1 turnip, diced
2 carrots, diced
2 celery stalks, minced
5 cups white button mushroom caps, chopped
1 1/2 teaspoons dried parsley
2 cups cooked pearl barley
Salt, to taste
Ground black pepper, to taste
Handful fresh parsley, roughly chopped, optional

Melt 1 tablespoon butter in a stockpot. Add the leek and cremini mushrooms and saute until softened, 3 to 5 minutes.

Place 1 cup vegetable stock, the leeks and cremini mushrooms into the bowl of a blender or food processor and puree until smooth. Set aside.

Place the remaining butter in the stockpot and melt over medium-low. Add the turnip, carrots and celery and saute until softened, 5 to 8 minutes. Add the button mushrooms, dried parsley and remaining stock and bring to a boil over high heat. Reduce the heat to medium-low and allow the soup to simmer, uncovered, for 30 minutes.

Add the pureed leeks and cremini mushrooms, barley and salt and pepper, to taste, and stir to combine. Simmer the soup for another 5 to 10 minutes, until the flavors have melded together. Ladle the soup into bowls and sprinkle the tops with chopped parsley if desired. Serve hot with bread or crackers.